Last update August 1, 2023
Overview
Many consumer goods brands have this problem:
- They have to charge different prices in different country markets
- Their products are presented internationally in different languages
- They must show online such complex catalogs, and possibly sell online, without putting at risk their off-line distribution nor confusing consumers which connect from different countries.
Besides prices, some catalog items, and languages, everything else is normally shared: barcodes, photos, SKU codes, all media.
To conclude the complexity, if there is an e-commerce platform connected to these websites, orders are normally fulfilled from different warehouses, and the international e-commerce system you build must therefore send orders to the correct warehouse.
How to solve online international price and language differentiation?
Selling internationally on Shopify
Can you sell internationally on Shopify
Selling multichannel has become the new normal, especially for retailers who want to scale their business, seizing the opportunities offered by multiple digital markets. In this new stage of retailing, marketplaces and eCommerce platforms play a leading role, fostering sellers’ business profitability, getting them access to a broad customer base, and boosting their product offer exposure.
For many sellers, marketplaces have been the starting point in their online retailing experience, but for sellers who want to boost earnings and brand awareness, creating a branded e-store on Shopify is the next step to take.
Convert your Shopify local store into an international one
Shopify is an international ecommerce platforms, with it you can start selling internationally and scale your business. But how to do so? Follow these 6 easy hints to convert your Shopify local store into an international one:
- Create one Shopify store dedicated to your first country. This first online store will be your master store, the one in which you first upload or create your content, such as product descriptions, product codes such as SKU codes and GTINs, product media such as pictures.
- Create a second Shopify store online store for your second geography. A typical set-up is Store-1 (master) for your largest market, for instance, your “home” market, and Store-2 (called slave) for the Rest-of-the world.
Note that you can design the schema as you need better.
Example: have the master store serving not your largest market, but your most complex market or the market in which you need the highest level of control or precision. - Create a subdomain under your main domain name and point it to the second store. For instance, have your www.brandname.com domain pointing to your main / master e-commerce site, and create a fr.brandname.com to serve the French market and have it pointing to your second / slave e-commerce website.
- Install on both stores an IP-recognition app, which will filter traffic coming from specific countries. Set the IP-recognition app so that it will direct the traffic to the correct online store.
- Upload your content both in your first and second store.
- Connect and sync listings across your two stores. You can do it with Nembol: connect both stores to Nembol. Nembol will take care of connecting your main Shopify catalog with your second Shopify store in the blink of an eye, saving you countless hours. Selling across countries with Shopify has never been so easy! Moreover, you can setup Nembol to provide a host of additional finer connecting functions, which will make your life even easier.
NOTE: As of Jun 8 2023, Shopify policies do not allow listing products from a Shopify store to another Shopify store. However, you can still connect your listings, and sync them.
How to manage Shopify international stores on Nembol
How to have differentiated prices on two stores
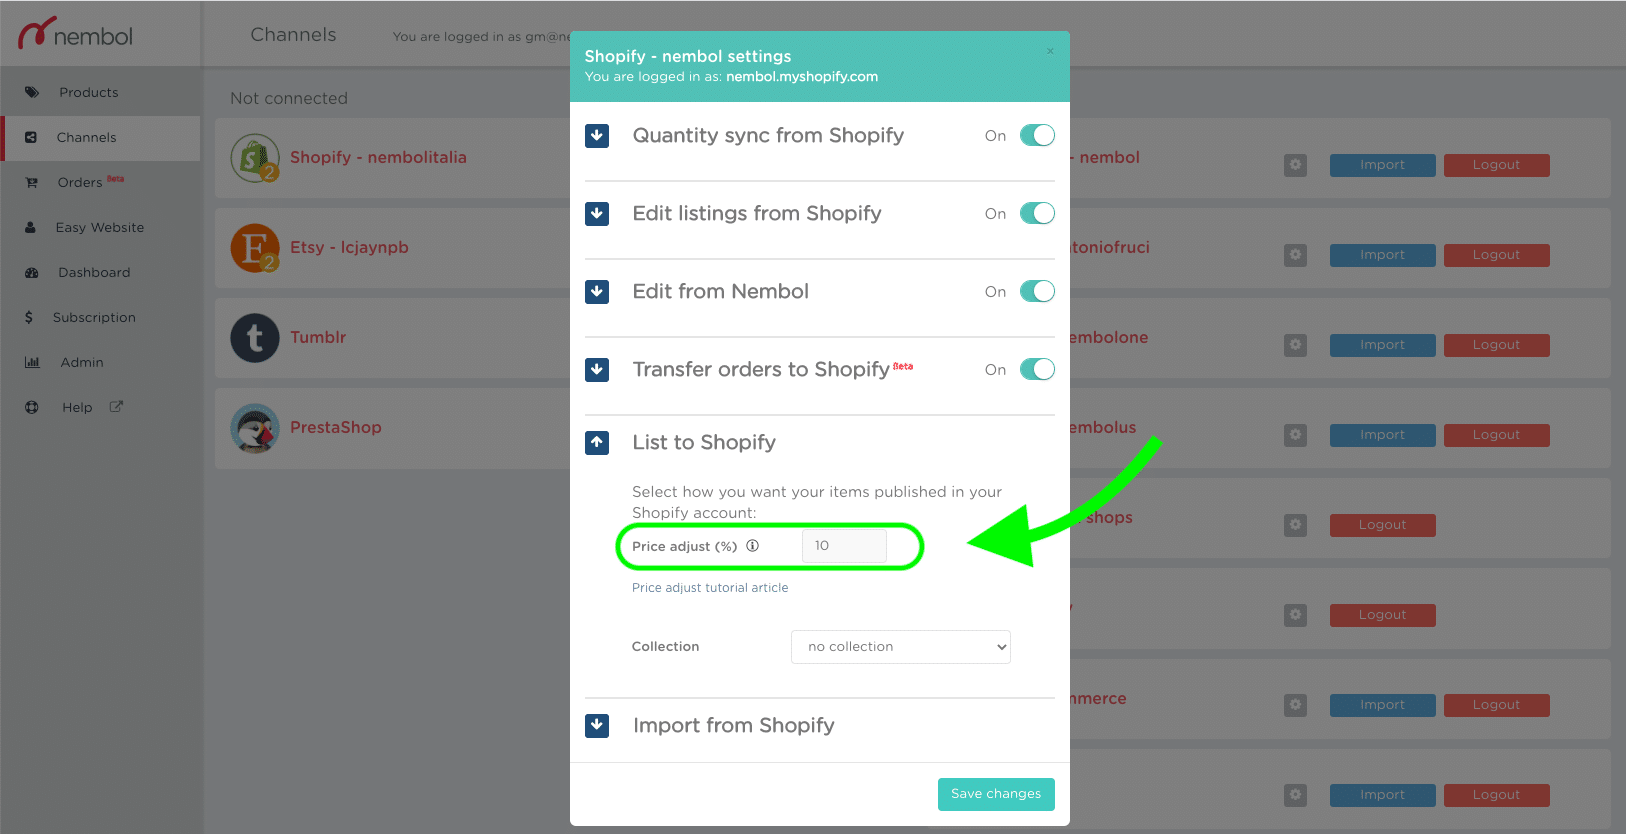
If you have different prices, you may either use the “Price rules” setting in Nembol (see Picture 1 below), in the “Sync settings”: set it to a positive or negative percentage.
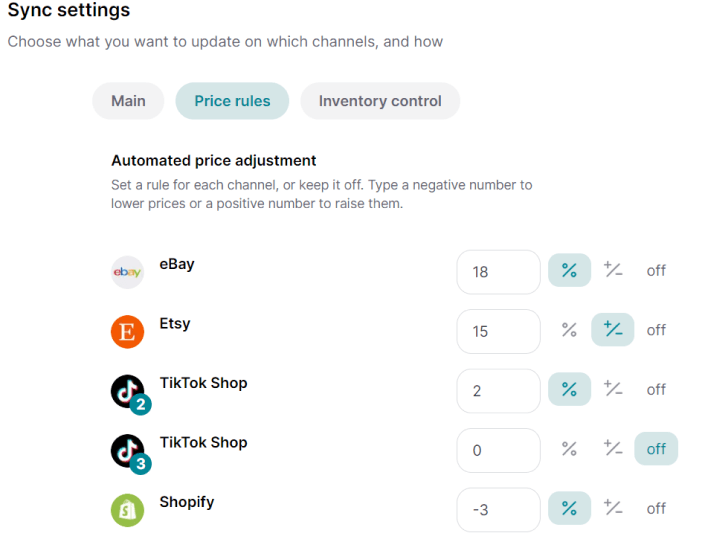
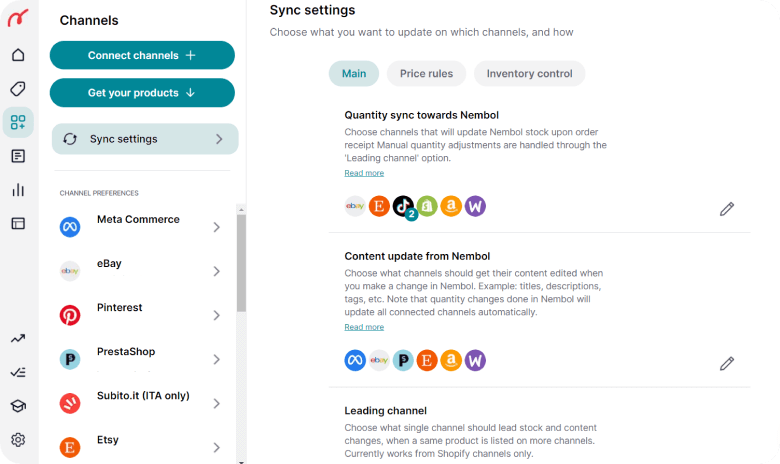
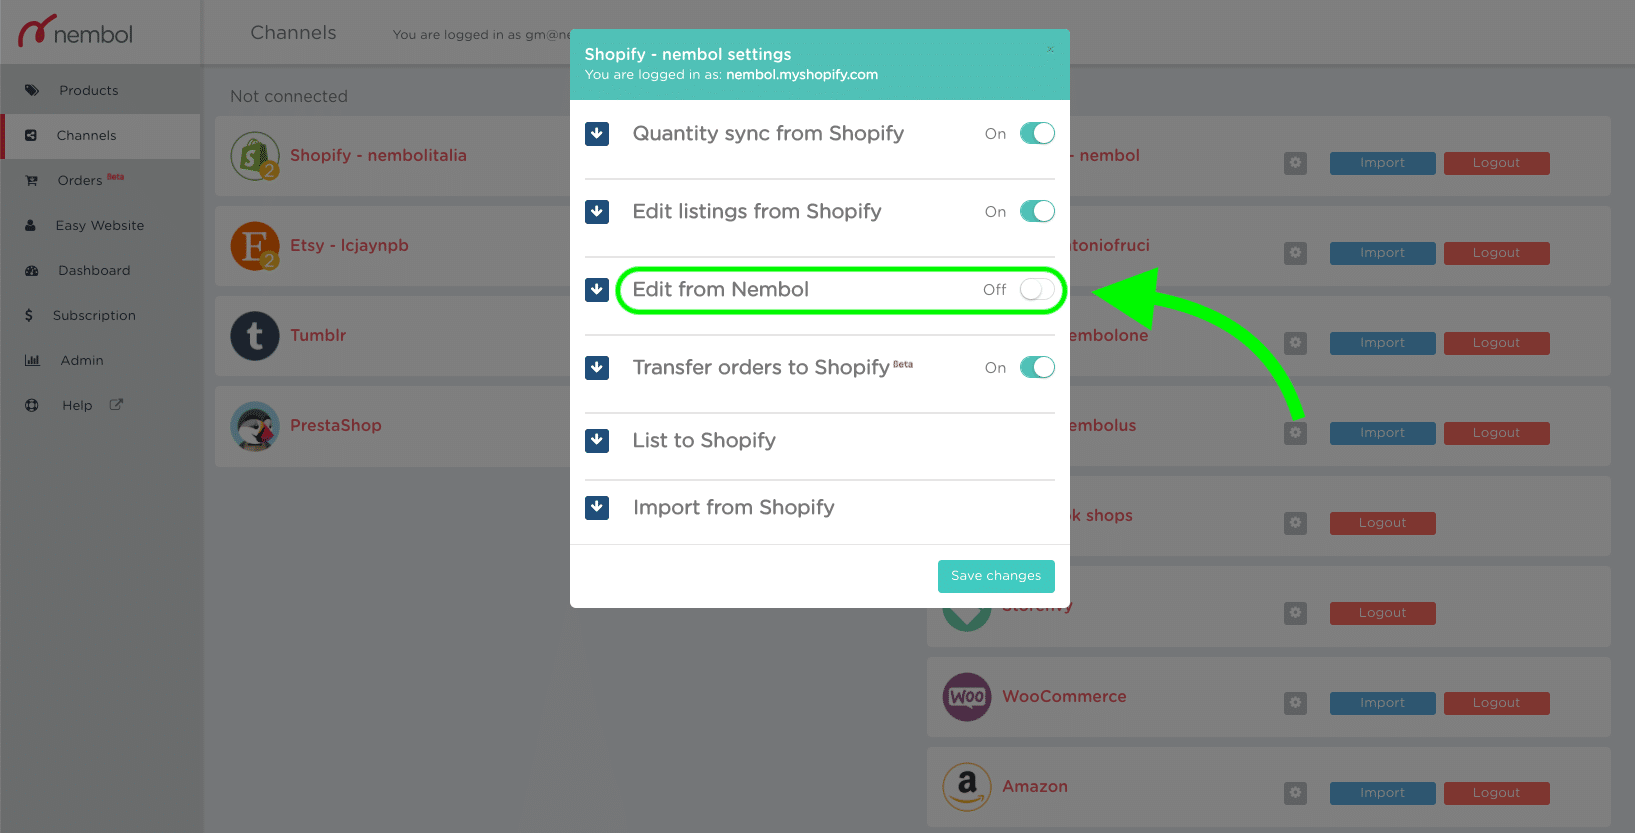
Otherwise, if you prefer having a specific price, turn Off the “Content update from Nembol” function (see Picture 2) and edit prices manually in your Shopify Store 2.
The latter solution of course is considerably less comfortable compared to using price-rules, because you have to do it manually at the outset and later every time you need a change.
Try Nembol for free: enjoy a 14-day trial
No credit card required
How to have differentiated content (e.g. language)
Differentiated content may be different languages in the most common case.
You can manage different languages by adding to your Store two a multi-lingual app. In this case, your main store, (or Store-1) will lead the main description in the main language to the Store-2, and you will have to equip the latter with one of many available multi-lingual apps.
This app will take care of translations, and of HTML language switches. In this scenario. you are better served by keeping the “Content update from Nembol” ON for your Store 2 in your Sync Settings, because each change you make in Nembol will be transferred to your Store two, and the multi-lingual app (which is independent from Nembol) will take care of updating the translations.
Working with Shopify as an e-commerce platform, you may also want to keep the “Leading channel” Shopify setting ON, so that you’ll be able to edit products in your Master Shopify store and have such edits pushed via Nembol to your Slave Shopify store.
Please note that you cannot have content edits (such as product titles or descriptions) automatically pushed to your Store-2, without also having prices synced. So the latter configuration works best when you can set automated price-rules between your two international stores.
If you have different inventory between your “master” and “secondary” stores
If you use the same warehouse for the two stores, set in Nembol “Quantity sync towards Nembol” ON from Shopify, so that Nembol will keep your inventory in sync across the two and hence towards the same warehouse.
If, otherwise, you will fulfill from two separated facilities with separated inventory, turn “Quantity sync towards Nembol” OFF from Shopify. This way, the two inventories will not influence one another, after the first listing.
How to sync orders to the same facility
If you are actually shipping from the same warehouse, or you are using the same order management team to fulfill both Master and Slave Shopify stores, you may finally choose to have orders transferred in just one of the two Shopify stores. This will be taken care of by Nembol.
To transfer orders, Nembol needs the ordered product to actually exist in both stores, and it will generate a new order in your chosen “order management” Shopify store. The new order will have the product as it is in the chosen Shopify store. The “Transfer orders to Shopify” function serves uniquely the need to ease order management by allowing a unique order fulfillment process to be applied to both Shopify Store 1 and Store 2. More will come on this function.
Now that you are set-up with the basic workings, the question arises naturally: what happens in season two, when I must add new products to both my Shopify Master store and my Slave store?
Shopify international shipping
As an international ecommerce platforms, Shopify has made it easy for merchants to sell their products globally by providing a range of international shipping options.
With Shopify’s built-in shipping settings, merchants can easily set up their shipping rates and delivery options for different countries and regions. Additionally, Shopify offers a variety of integrated shipping carriers and apps, which allow merchants to simplify their shipping processes and automate tasks such as printing labels and tracking packages.
With these tools, merchants can expand their customer base by offering reliable and cost-effective shipping options to customers all around the world, helping to grow their businesses and increase sales.
Conclusions
After reading this article, you now know how to set up a set of two Shopify stores to start selling across countries, with a choice of:
- Dedicated international prices
- Dedicated language content
- Dedicated fulfillment warehouse
- Centralized order management in one of the two stores interface
Please do not hesitate to try Nembol, free for up to 14-days or till you upgrade to a Pro Plan, and chat with us in-app if you need any further information or have any suggestions.
Dear reader, have a wonderful rest of the day, or night.
Frequently Asked Questions
Can I sell internationally with Shopify?
Yes, Shopify allows you to sell internationally by setting up multiple online stores for different countries or regions. Each store can have its own pricing, language, and fulfillment process, helping you tailor your eCommerce strategy to each market.
How can I show different prices in different countries on Shopify?
You can show different prices by creating separate Shopify stores and using pricing rules or manual price edits. Tools like Nembol allow you to apply automatic price adjustments or manage fixed prices in your secondary store.
How do I manage multiple languages in Shopify stores?
To manage multiple languages, install a multilingual app in each Shopify store. These apps handle translation and language switching. You can Sync content between stores using tools like Nembol, while the app manages the translated version.
Can I sync inventory and orders across Shopify stores?
Yes, you can sync inventory and orders using integration tools. If you use the same warehouse, enable quantity sync. If using a separate warehouse, turn it off. Orders from both stores can also be centralized for processing in one store.
How do I redirect users to the right Shopify store based on location?
You can redirect users by installing an IP detection app that identifies the user’s country and automatically routes them to the appropriate Shopify store or subdomain, ensuring localized content and pricing.

