Last update November 10, 2023
Overview
Building up your store with Shopify, you will need to publish and collect products into different sections of your websites, giving structure and hierarchy to categories to ease customer navigation on your store.
To do so, all you’ll need is to create as many Shopify collections as the different sets of products you sell, choose between automatic or manual collections, and build your own labeling system to assign products to each belonging category.
Don’t know where to start? Don’t worry! In this article, you’ll discover all the basics of categorization and how to organize products on Shopify. You’ll understand all the pros and cons of automatic and manual collections, and learn a few effective tricks to automate and speed up the categorization process.
Keep reading to know more!
What is a collection on Shopify
Shopify categories vs collections
Even if they are called differently from what sellers are used to, Shopify collections are basically custom categories whereby address and gather all products that have kindred features (seasonality, material) or match the same customer target (women, men, or kids).
The main difference between categories and Shopify collections is that, while collections are standard built-in folders, collections need to be created by the seller on the basis of the product offer.
Therefore, as a seller you are free to create your own collections, but bear in mind to prioritize two main aspects:
- The ease of navigation. It will increase buyers’ chances of finding products
- The use of categories already known for the type of product sold. Although you can create your own categories, to avoid confusion, you should be creating collections commonly used for certain types of products. By organizing your products into relevant collections, you can create a more logical and intuitive site structure. This can help search engine crawlers better understand the organization of your site and the relationships between your pages, eventually improving your Shopify SEO.
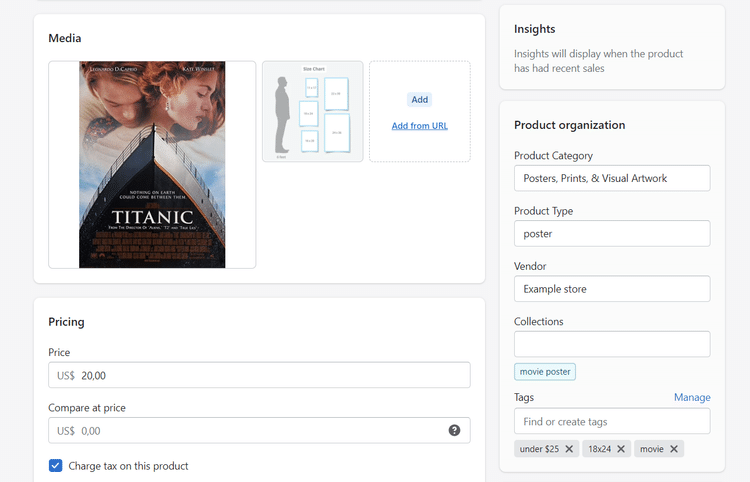

Let’s say you sell prints:
- Your standard category will be “Posters, Prints, & Visual Artwork”.
- Your collections can be used to divide prints into different macro groups, such as illustrations, movie posters, band posters, etc.
- Tags need to be created both to refine the search or to sort products in your automatic collections, e.g 18×24 (sizes), vintage (condition), under $25 (price), etc.
So, to efficiently organize products in your Shopify stores you need to use both collections and tags.
Using them systematically is a life hack for Shopify retailers.
How to organize products on Shopify
As mentioned above, on Shopify, there are two types of collections: automatic and manual.
The Automatic collections, aka smart collections, are able to automatically sort your products into your different collections on the basis of pre-set conditions. When a product matches the conditions, Shopify automatically puts it in the corresponding collection.
You can set just one or multiple conditions to be sure the product goes into the right folder.
Even though smart collections are easy to use and are time savers, using them you’ll have less control over your product categorization.
The Manual collections are not responsive and need to be created and manually assigned to each product while publishing them. Using them is a good fit for sellers that want to have a high level of control over products.
You can decide to organize your store using only one or both collection types. What we suggest is to be consistent: start building the store with the automatic or the manual and keep using it over time. That will avoid hassle or confusion while categorizing your products.

Discover exclusive content, insider tips by subscribing to our newsletter. It’s quick, easy, and free! Join now and get a 10% discount!
By entering your email address, you accept our Privacy Policy and Terms of Use. Totally free. Unsubscribe at any time.
How to add a collection on Shopify
How create a manual collection
Creating collections in Shopify it’s super easy, let’s see how to do it.
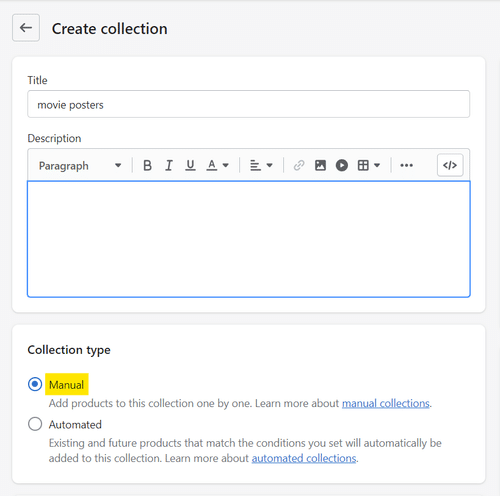
To create a manual collection, all you need to do is:
- Access your Shopify backend
- Click on collections to open the “Create Collection” tab
- Add a title and a description
- Scroll down and on “collection type” opt-in for “manual”
- Click on Save, and you’re done!

Try Nembol for free: enjoy a 14-day trial
No credit card required
How to create an automated collection in Shopify
To add a smart collection on Shopify, there are some additional steps to follow:
- Open your Shopify backend and click on the Shopify collection page.
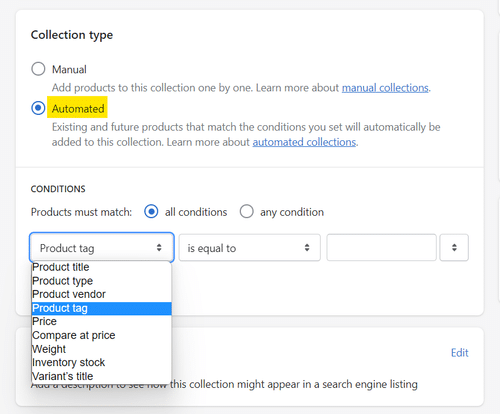
- Once you have added a title and a description, scroll to “collection type” and pick “Automated”.
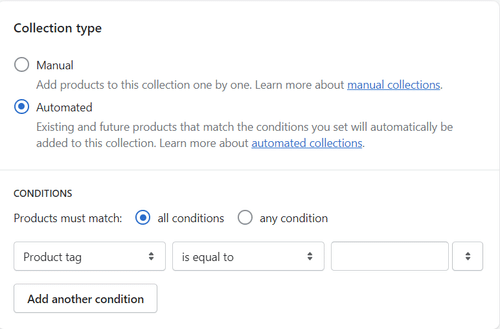
- As soon as you select automated, you’ll need to add one or multiple conditions to let Shopify automatically categorize your products.
- Choose the rule product must match to be assigned to the collection you’re creating. Select what product data must match the rule (the title, tags, price, stock, etc).
- Select the condition products with a certain title, tags, price, stock, etc. must match to be assigned to this collection.
- Save, and you’re done!
For our movie poster example, we have set our automatic collection in this way:
Products must match “all conditions” > Product Tag > is equal to > “movie”.
That means, that every product tagged with the label “movie” will be automatically assigned to this Shopify smart collection.

How to add products to collections on Shopify
Now that you have learned how to create them, let’s see how to add products to a manual or a smart collection:
- Create or open a product.
- Scroll down and check on the “product organization” section.
- If you use manual collections, click on the “collection” field and choose the one to use.
- If you have smart collections, unless you use tags, you don’t need to do anything. In the example above, we used tags, therefore if we want to assign this product to the “movie poster” collection, we should tag it with “movie”.
- Save, and you’re done!


Shopify: export products with collections
There are different reasons that lead sellers to open multiple Shopify stores: boost the reach, increase sales, and sell different sets of products.
Besides all the pros, you can be scared of creating a new Shopify from scratch and assigning each product to collections. Luckily Nembol has a solution to help you save time and bulk list products on Shopify effortlessly!
With Nembol you can transfer a copy of your Shopify listings and assign them to your pre-set collections, all you need to do is:
- Set in your new Shopify (let’s call it Shopify_2) manual or automatic collections:
— If you create manual collections, all of them will be displayed in your Shopify_2 settings in Nembol, so you’ll easily pick the one you need while bulk listing.
— If you create the automatic ones, you won’t need to do anything. Nembol will be able to push products, which will be sorted into all the categories according to the set conditions. - Import your Shopify_1 products in Nembol
- Bulk select products in the Nembol Product Tab > Actions > Publish > Shopify_2
- All done!
You can even list Etsy, eBay, and Amazon products on Shopify and let Nembol bulk list and assign them to your favorite category, read more:
Frequently Asked Questions
How do I manage collections in Shopify?
You can manage collections in Shopify by going to Products > Collection in your admin. From there, you can edit, organize, and assign products to collections manually or automatically using set conditions.
Do tags matter on Shopify?
Yes, tags matter. They improve product discoverability, help with internal search and filtering, and allow you to automate collections efficiently.

