Last update November 24, 2023
Overview
If you want to grow your online business, sooner or later you will need to list your products on additional online channels. Let’s see how to do it with:
- The minimum money expense
- The minimum effort
- The minimum time spent
- The minimum number of errors
This article will pave your way into being seen by thousands of additional potential buyers. So first of all, let’s be clear on WHY you should list your items on multiple channels.
Nine types of channels you can list your products on:
Ecommerce platforms and marketplaces
- Your own e-Commerce platform: for example, Shopify, WooCommerce, or PrestaShop.
Note that some sellers have multiple online stores under different brands and with different price positioning. - One or more general marketplaces: Amazon and eBay generate the bulk of online sales volumes in the Western markets (Amazon totaled an estimated $693Bn Gross Merchandise Value in 2022, while eBay $73.9Bn. Many so-called “smaller” marketplaces are in the Billion $ GMV too).
- One or more vertical marketplaces: sites such as Etsy (a marketplace for makers, artisans, artists, and vintage items) or Houzz (a marketplace for home and garden), or other vertical marketplaces can be a smart venue to display your wares and be exposed to new potential customers.
Social media
- Facebook Shops and Instagram: Facebook Catalog is currently the hub to list products on both Facebook Shops, Facebook Page’s shop section, and Instagram. Of course, this opens you to present your items to Facebook users.
- Other social media: Tumblr, Pinterest, Twitter, Facebook are all online venues on which a seller can present their wares.
- LinkedIn: Microsoft-owned website for companies and professionals recently added Product pages where software products and professional services can be listed.
Additional selling venues
- Classifieds sites such as Craigslist in the US, Gumtree in the UK, Kijiji in Canada or Italy, or their country-specific competitors. Each local market has its specific classified listings champion and in many cases presenting your products on them is worthwhile, unless it is too time-consuming because you don’t use the right listing tool.
- One or more price-comparison engines: each country has its own price-comparison engines. These sites typically list your items starting from a data-feed and work on a Pay per Click (PPC) business model (e.g. PriceGrabber).
- Google Shopping: Google Merchant Center is the hub to feed your products to Google properties, including the Shopping Pages of the Google Search Engine Result Page (SERP).
Why selling your products on multiple online channels
As we’ve briefly seen above, different online marketplaces can be geared towards different consumer segments: for instance, Etsy for artisanal goods.
In addition, the large marketplaces such as eBay, Amazon, and Etsy are product search engines for their own sake, on which shoppers seek and compare products.
Beyond this, all of the larger marketplaces have their own mechanics of interaction with the general search engines such as Google, Bing, Baidu, or Yandex and often purchase advertising from them.
Also, price comparison websites such as Kelkoo, Shopping.com, or the equivalent bunch in your own country appeal to specific target customers, have their own relevance in the SERP (Search Engine Result Page) of the major search engines, and are often used by shoppers to find and compare products before finalizing a purchase.
You can leverage on marketplaces, which are built-in audience platforms, to boost your brand recognition and finally drive traffic to your e-commerce website. For instance, you can use Etsy to sell your handcraft products and, at the same time, running your own Shopify store to have your personal and customizable space.
Read more: Why sell both on Etsy and Shopify is a winning strategy.
Listing products on social media is of course a way to interact with your brand’s or your store’s followers, and to present them with the latest arrivals, or to define your brand positioning.
Why should you use an e-Commerce platform
Finally, you can go all the way to having multiple personal online stores. At Nembol, we’ve seen several sellers running multiple stores, and our experience tells that you can do it for four main reasons:
- You sell different categories of products, so different that they cannot be shared in the same store-front. In this case, you can link two online stores, for instance to Shopify’s, to your Nembol account.
- You have one type of product, but you wish to keep differentiated content. In this case, you can connect your two Shopify to Nembol, import and link products, and start syncing their inventories but keeping content independent.
- You are migrating from a different e-commerce platform, say from Shopify to WooCommerce, or from PrestaShop to Shopify, or any other direction. In this case, you can use Nembol to migrate the whole of your catalog from one platform to another without the need to manually transfer all content.
- You run an e-commerce operation that sells internationally, and have prices in different currencies. In this case, one good option is to run two Shopify stores, connected via Nembol, each of the two configured in the correct currency, and possibly using Nembol price-rules to automatically set prices.
Now that you’ve determined you should list products on multiple online channels, let’s see how to do it properly.
How to start listing on multiple online venues, or websites
You can be in one of three categories of online sellers:
1) You do not have listings online yet
In this case, you may have no structured digital content yet for your catalog (meaning you may have pictures and some text description, but this content is not organized). Or you may have a part of your content in some files, say an Excel file, or inside an Enterprise Management software.
In this case, you can upload or type your content into Nembol, and use Nembol as your hub to list on multiple online channels and keep the inventory in sync across them.
2) You have listings on one online channel
And you are fairly happy with these listings and how they present, as you and your team have been working on them for a substantial amount of time.
In this scenario, you can connect this channel to Nembol, import the existing listings, edit them if you like, and then use Nembol to cross-post the listings on multiple additional channels. Nembol will easily replicate the listings and sync inventory and product edits if you wish.
3) You already have listings on multiple channels
And you just want the inventory on each channel to be kept in sync when you receive orders. And possibly you’d like to manage all your orders in the same place. In this case, you can import into Nembol your listings from what you consider your “main” channel, then import from your other channels and Nembol will automatically link your multi-channel listings without duplications if your listings share the same SKU codes.
Now let’s see these cases one by one in detail.
How to list products on multiple channels if you have no online listings yet
If you already have some digital content for your products, for instance in a spreadsheet file or inside an ERP software, you can upload it into Nembol as a CSV file.
A CSV file is a “comma-separated file” i.e. a text file used to exchange information across data-based systems. It is the world standard to move content from one system into another, and it is fairly easy to use.
In a CSV file, pictures are represented as URLs, i.e. as Internet addresses. If you don’t have this possibility, you can always upload pictures later directly inside Nembol.
Once your CSV has been uploaded into Nembol, you can check and update each product, or a sample of a few of them, make minor or major edits, such as adding pictures, or tags, or category keywords to ease automated categorization on eBay and so on.
If you instead do not have organized digital content for your products yet, a good option is using Nembol to create it, organize it, and keep a backup of it.
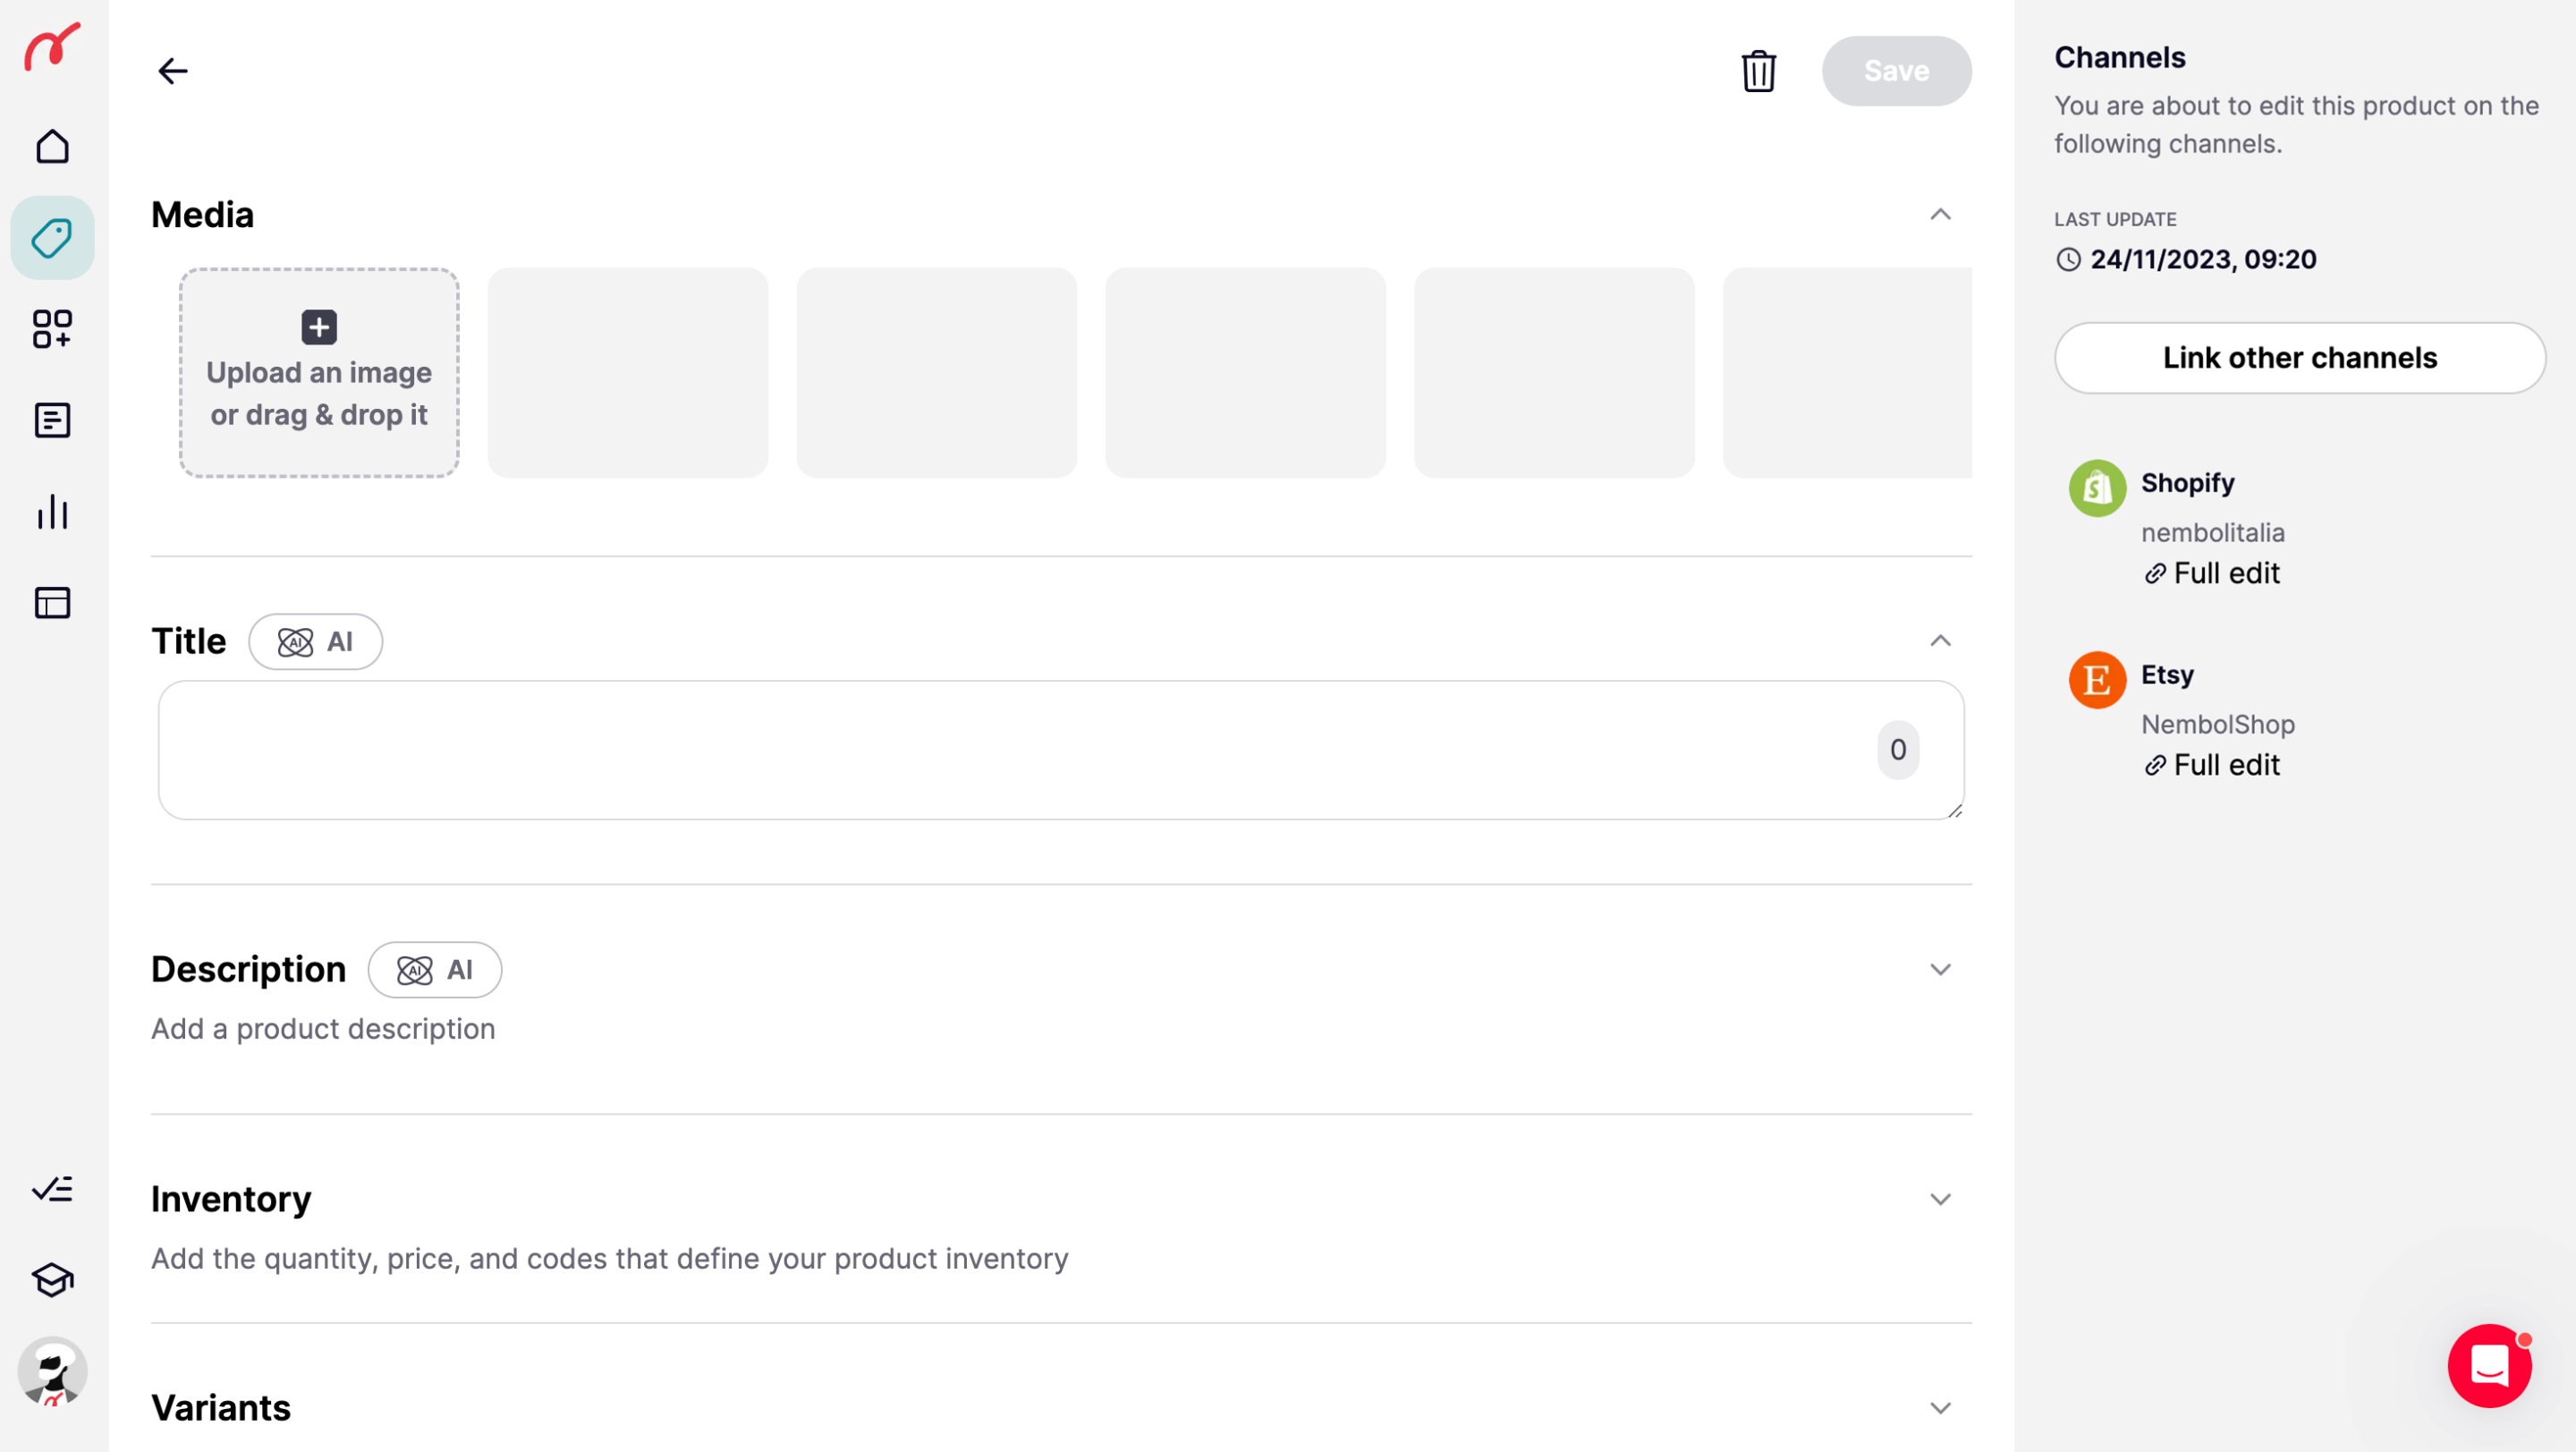
Just open Nembol, go to the Products Tab, and add a new product. You’ll see the form below where it is easy to add pictures, a product title, a formatted description, price, SKU codes, GTIN such as EAN or UPC, and variations such as size, color, material, or versions.
This article explains how to import your products using a CSV. You can then publish on multiple channels. Continue reading to learn how.

Connect a new channel to Nembol
Nembol as well as other multi-channel management software can’t be working unless your account is connected to your preferred online channels.
Suppose you are an eBay seller, or an eBay and Amazon seller, or even more that you sell on say six channels: eBay, Amazon, Etsy, Shopify, Facebook Shops. Nembol can list your products across the six of them, and keep updated your warehouse count (your stock, or inventory), only if you connect Nembol to each of them, and always keep it connected.
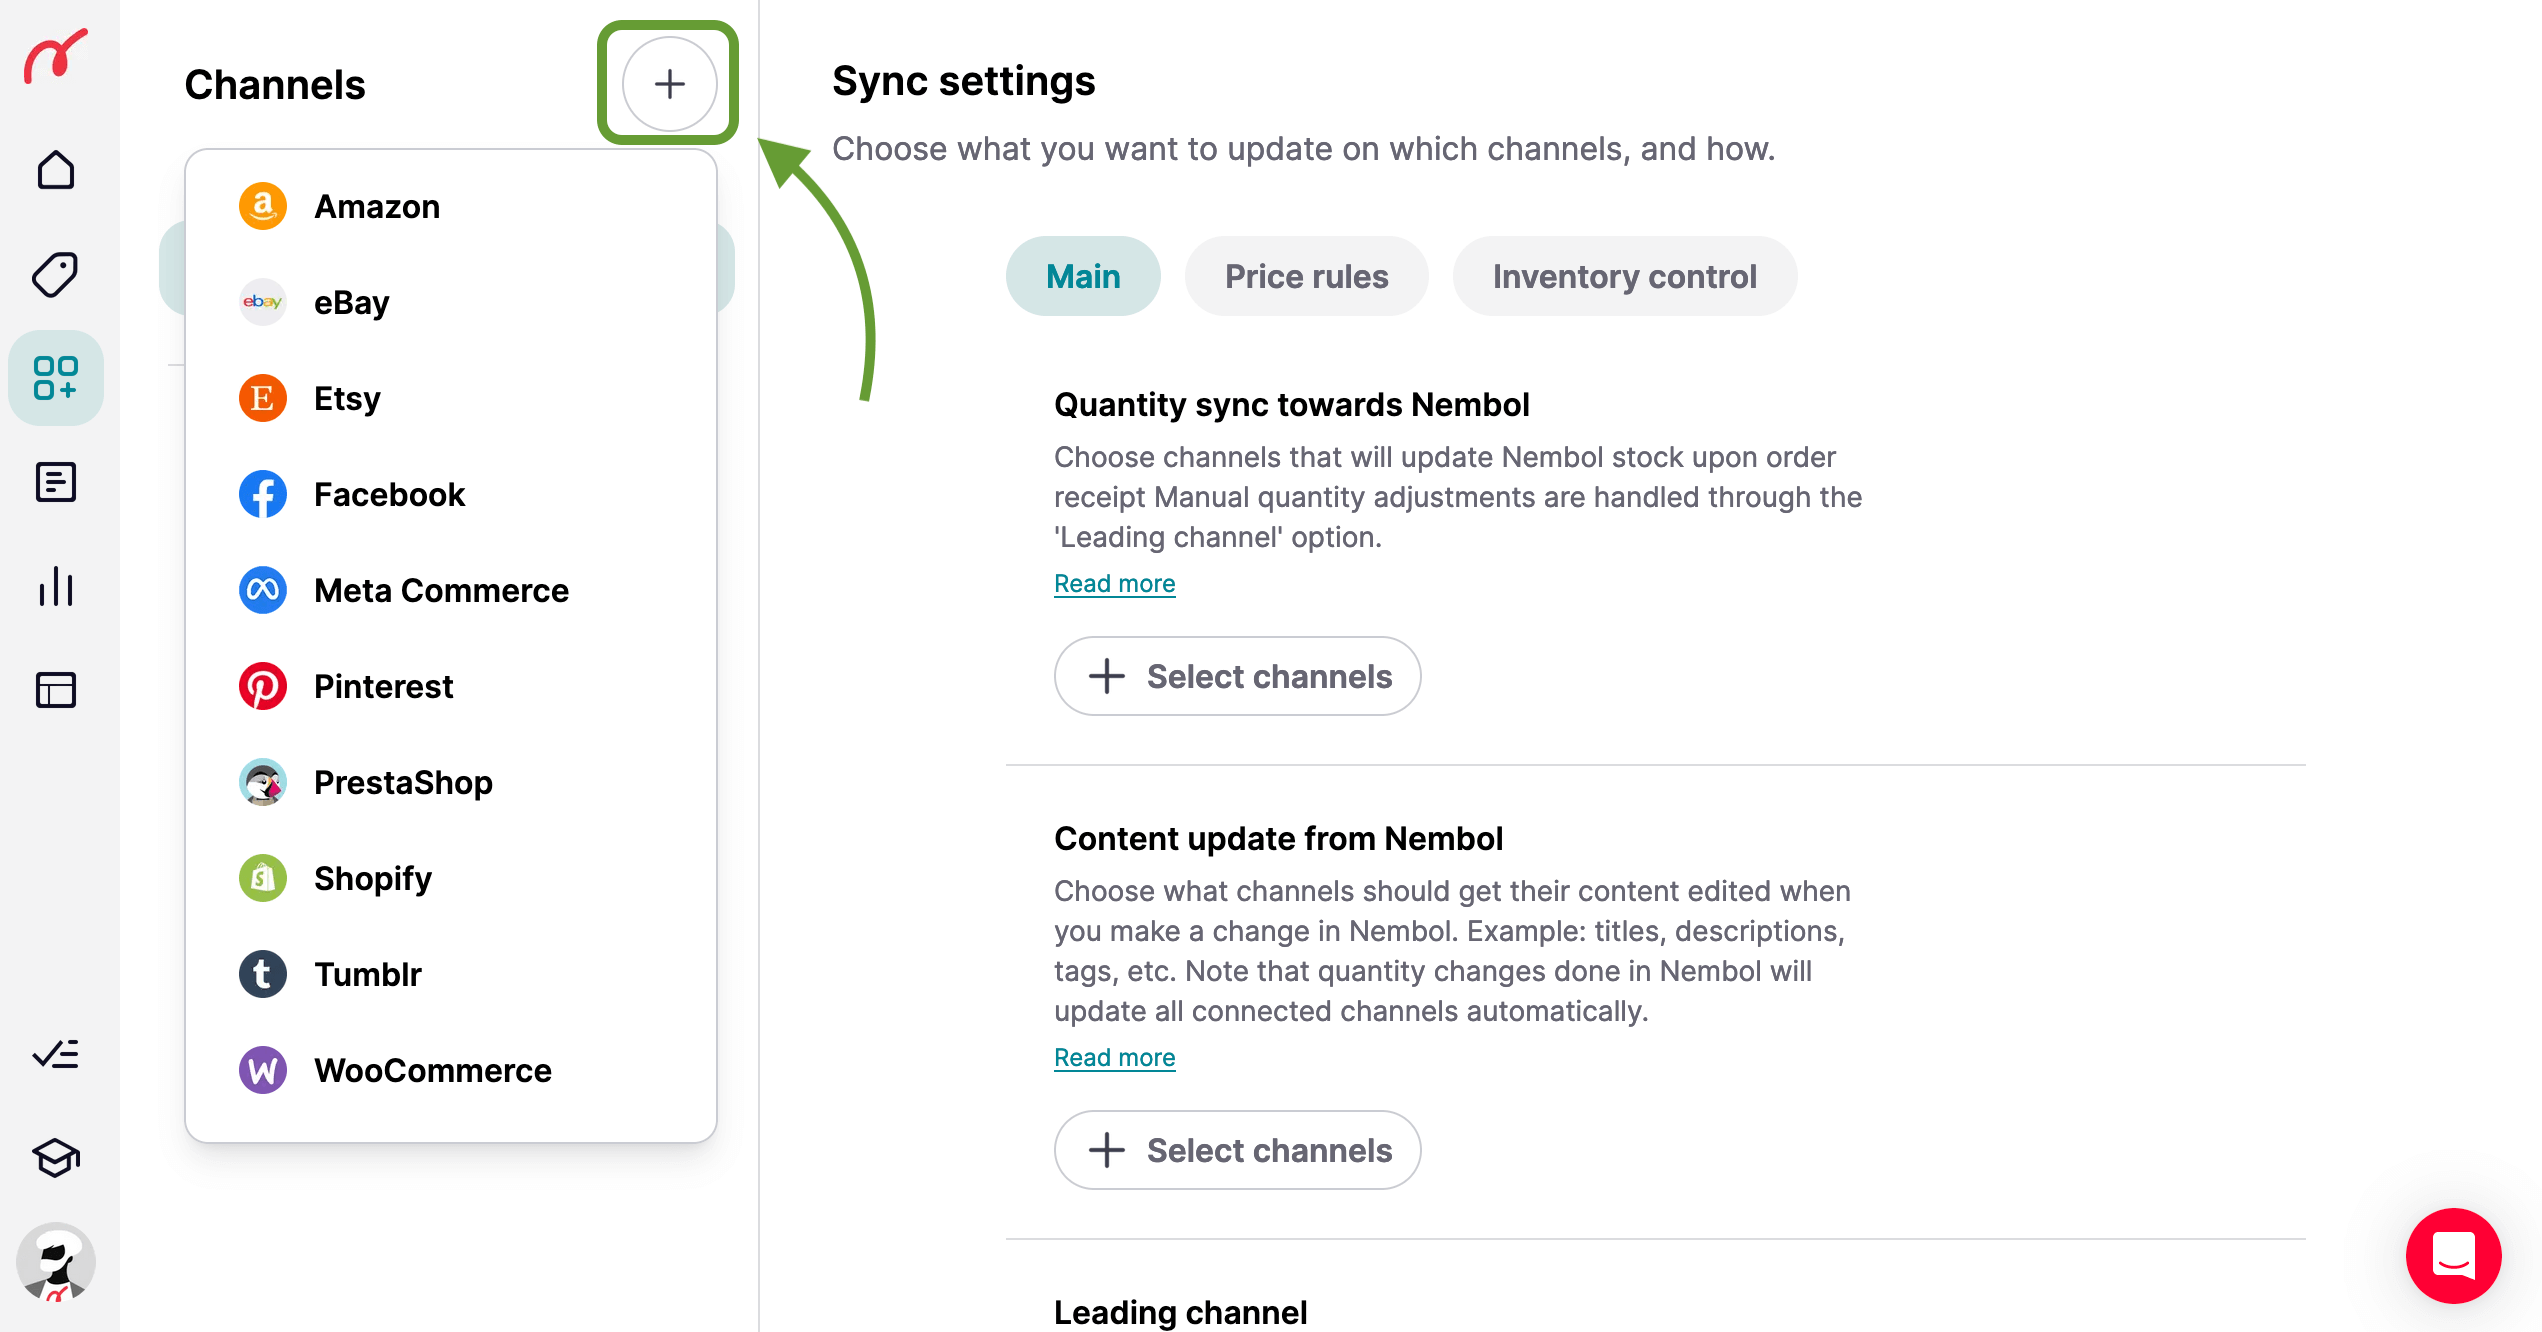
All you need to do is go to the Channels Tab and Click on the “+” button. After this, click on the channel you want to connect and follow the instructions displayed on the display. You’ll be immediately transferred to a page on the channel’s website, where you’ll be asked by the channel to grant the necessary authorizations to the Nembol App. Once this step is completed, you’ll be returned to the Nembol App, with your desired channel connected and ready to be set up.

Also: you may have noticed that each online channel has its own rules, and accepts content not always identical to another channel. For instance, tags may be formatted differently, or categorization may be structured in a different fashion. Nembol will help you solve many of these hassles in a quicker way, but you should still test-list with a few products to see how things roll when you cross-list from a channel to another.
How to list on multiple channels if you already have listings on eBay, Amazon, Shopify, WooCommerce, Etsy, or PrestaShop
If you already have listings on an online venue, say eBay, or Amazon, Shopify, WooCommerce, PrestaShop, you are advised to connect Nembol to such account and export your listings from that channel into Nembol.
- As a first thing, you’ll have to log in to that channel from Nembol, using your Channel’s login name and password.
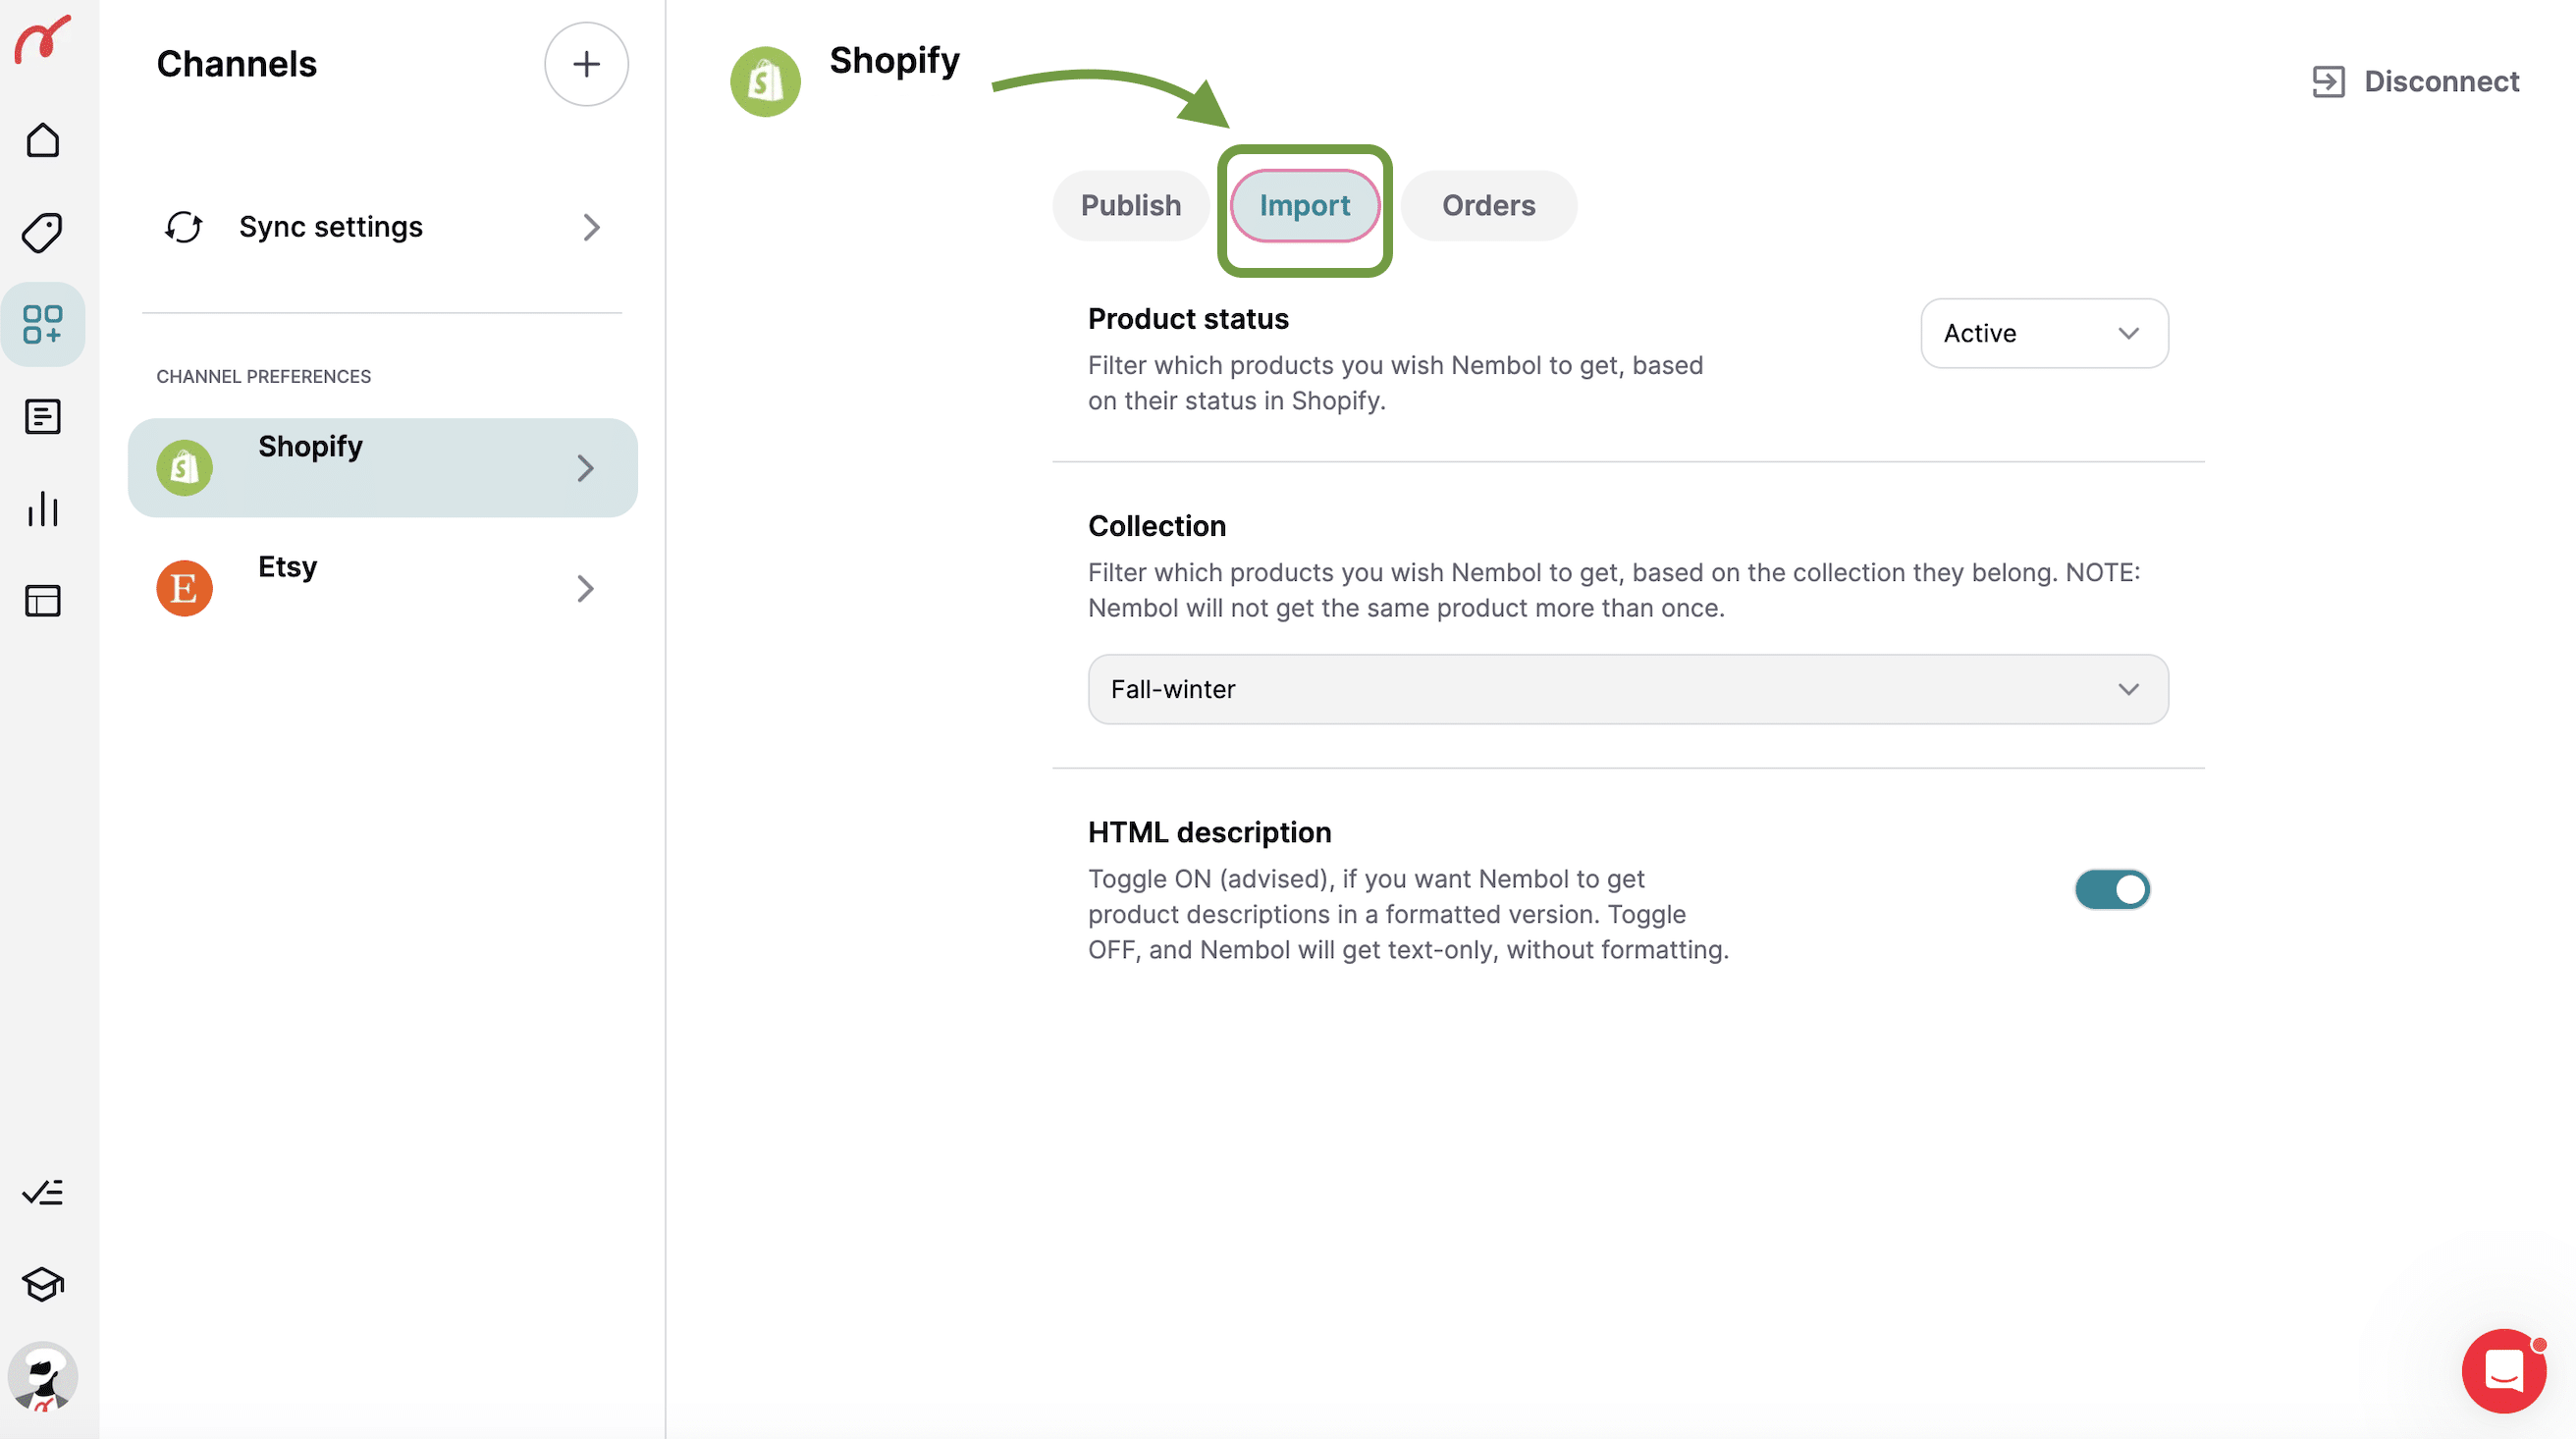
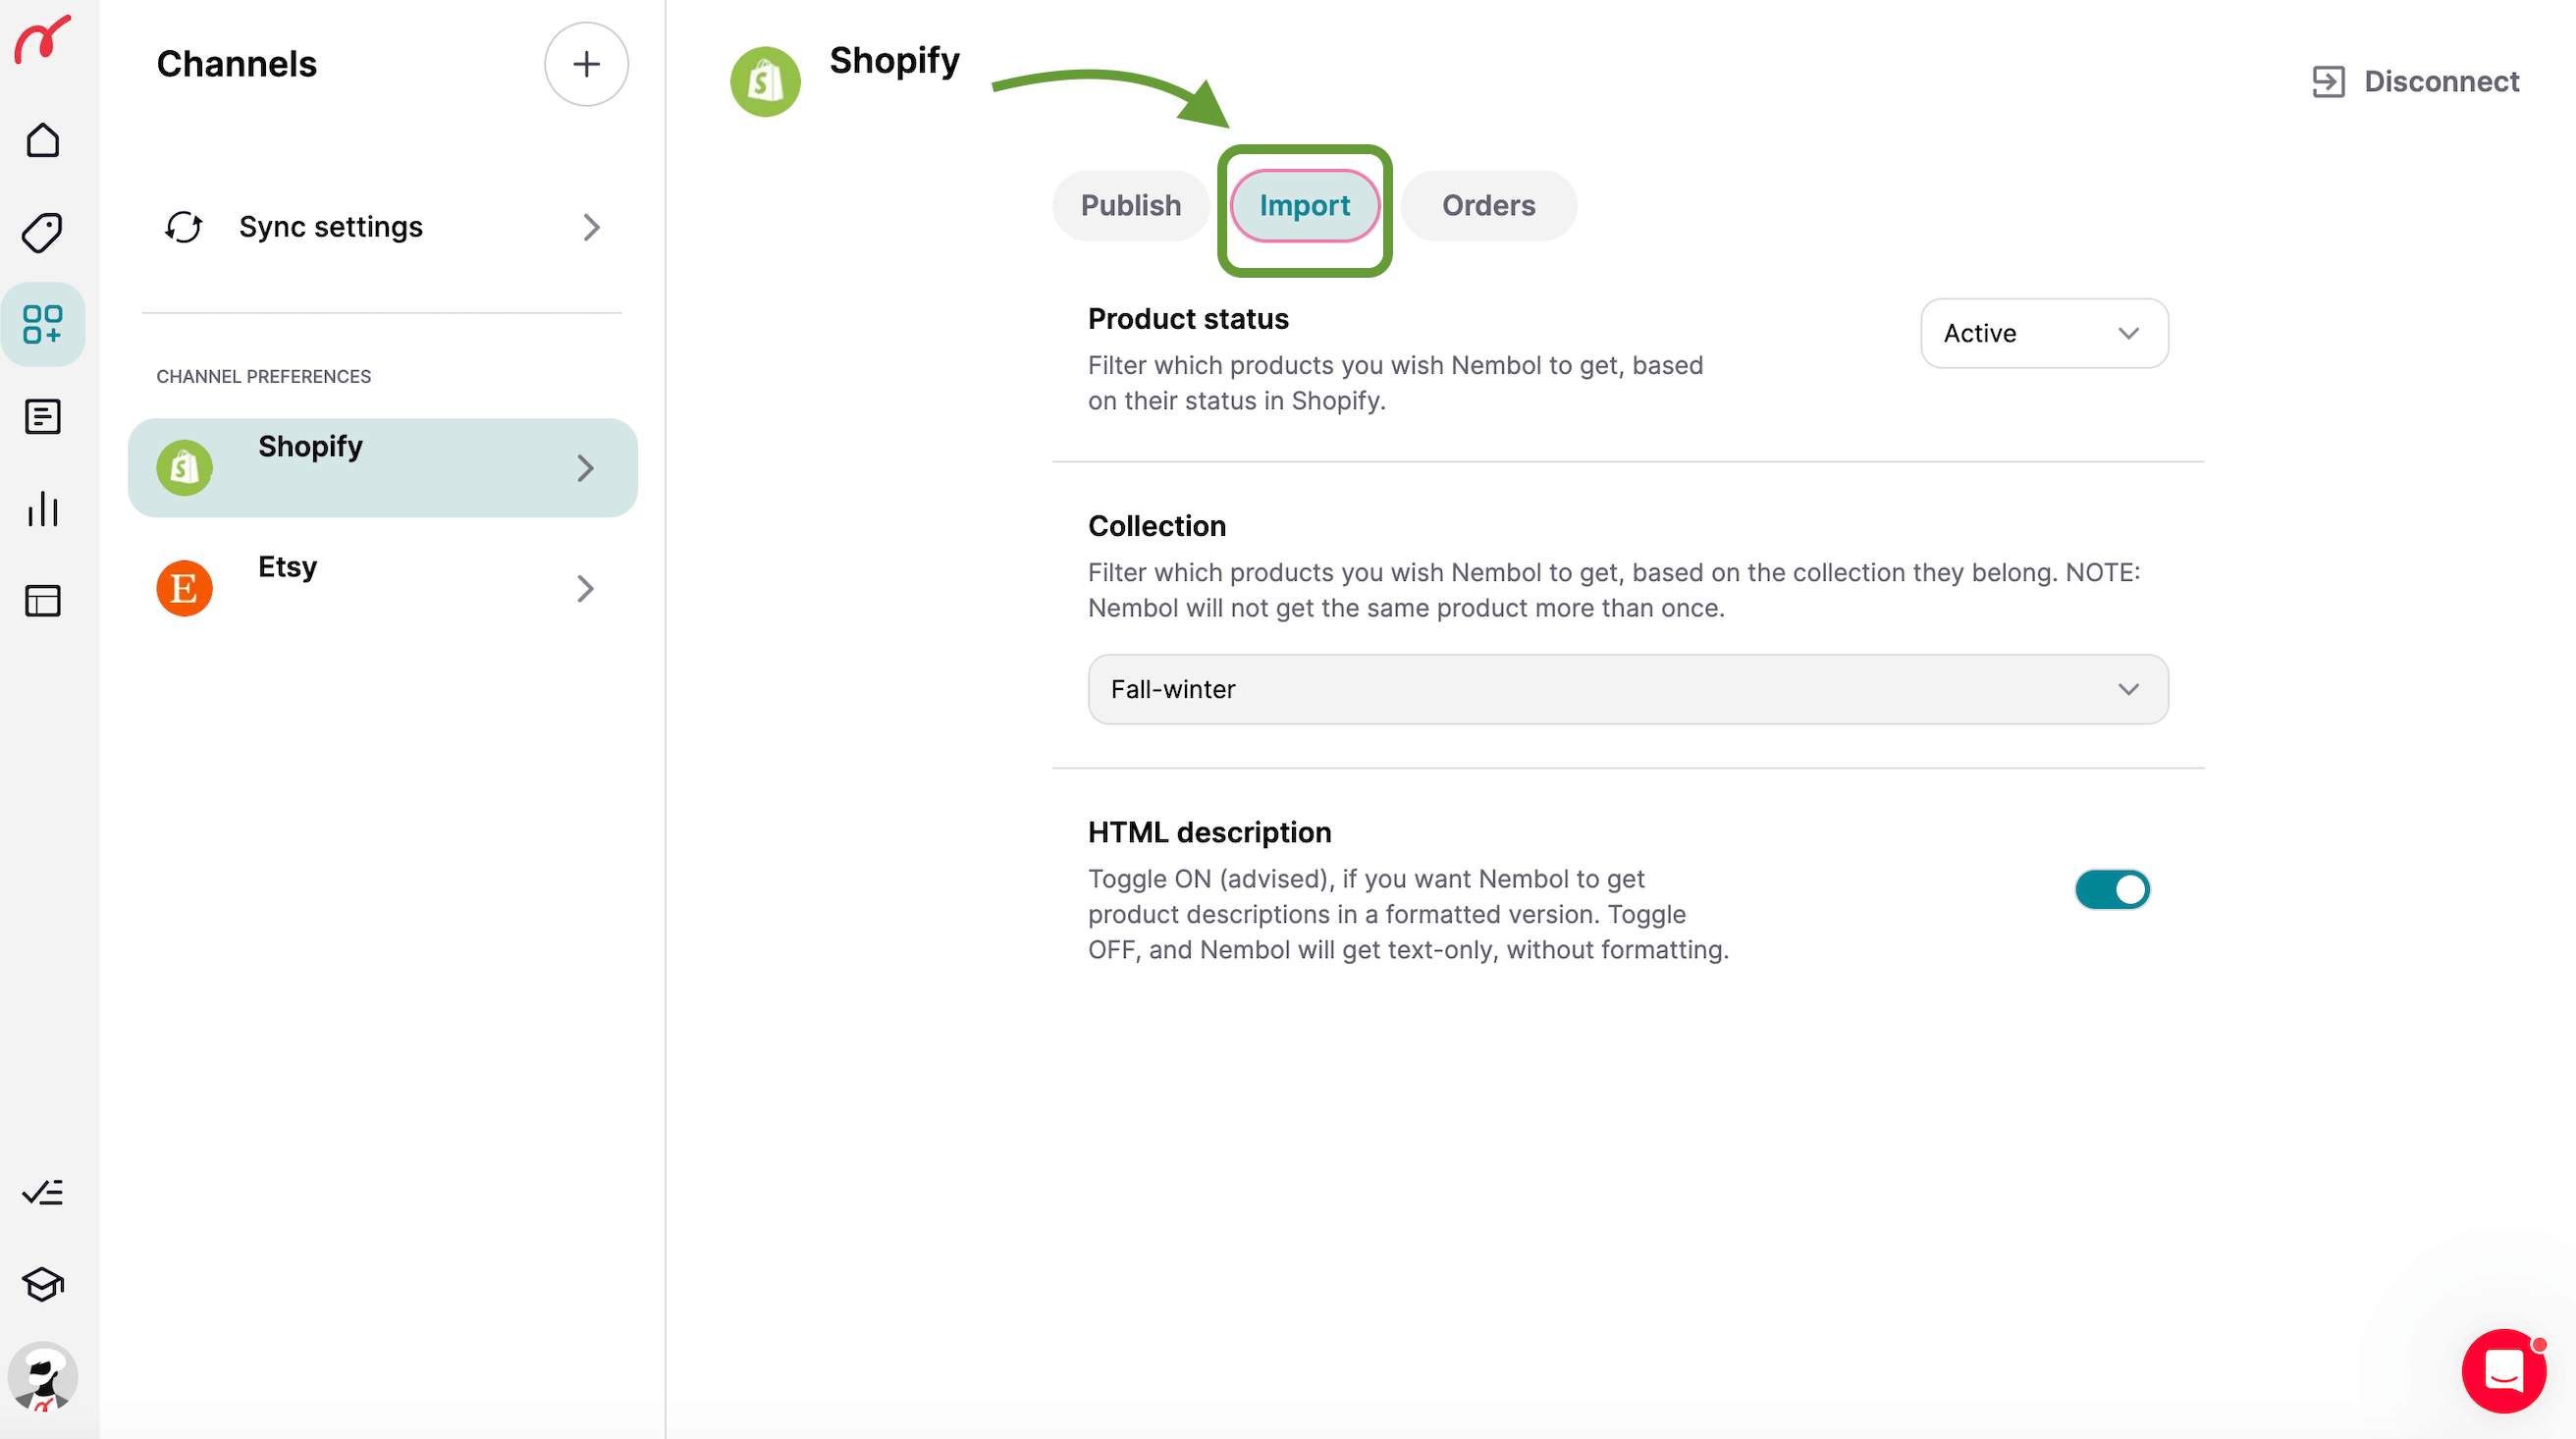
- Then you may want to set your import filters in Nembol if you have plenty of listings in that channel and do not want to list them all on multiple channels. Larger Nembol plans allow users to filter at import. This feature is designed for larger sellers so that they can save on Nembol fees, as well as on listing fees. You may filter at import in Nembol, depending on the channel, by category, by collection, or by listing status. You set the filters in the “Import” settings in each channel in Nembol. In the screenshot below, you can see the example for the Shopify channel.
- Once you’ve set your “Import” settings from a channel towards Nembol, simply go to the Products page and click on the “Import” button. Now select “Import from Channel” and choose the Channel from which you wish to import. Once you click on the ‘Import from channel’ button, the import will start.
You can see the status of your import in the Activities Tab, which you will find bottom left, in the main menu.
Just bear in mind that:
- During the 14-day free trial, you can publish up to 10 products per channel. This is enough to test Nembol features, without effort.
- Nembol is not a way to circumvent channels’ rules. Therefore if your account on a channel has been blocked, or some of your items banned, chances are that Nembol will not be allowed to connect to that account or to extract those items. Fingers crossed.
You will have to wait a few minutes to see your listings inside Nembol. Just move to the Products page in Nembol and refresh it.
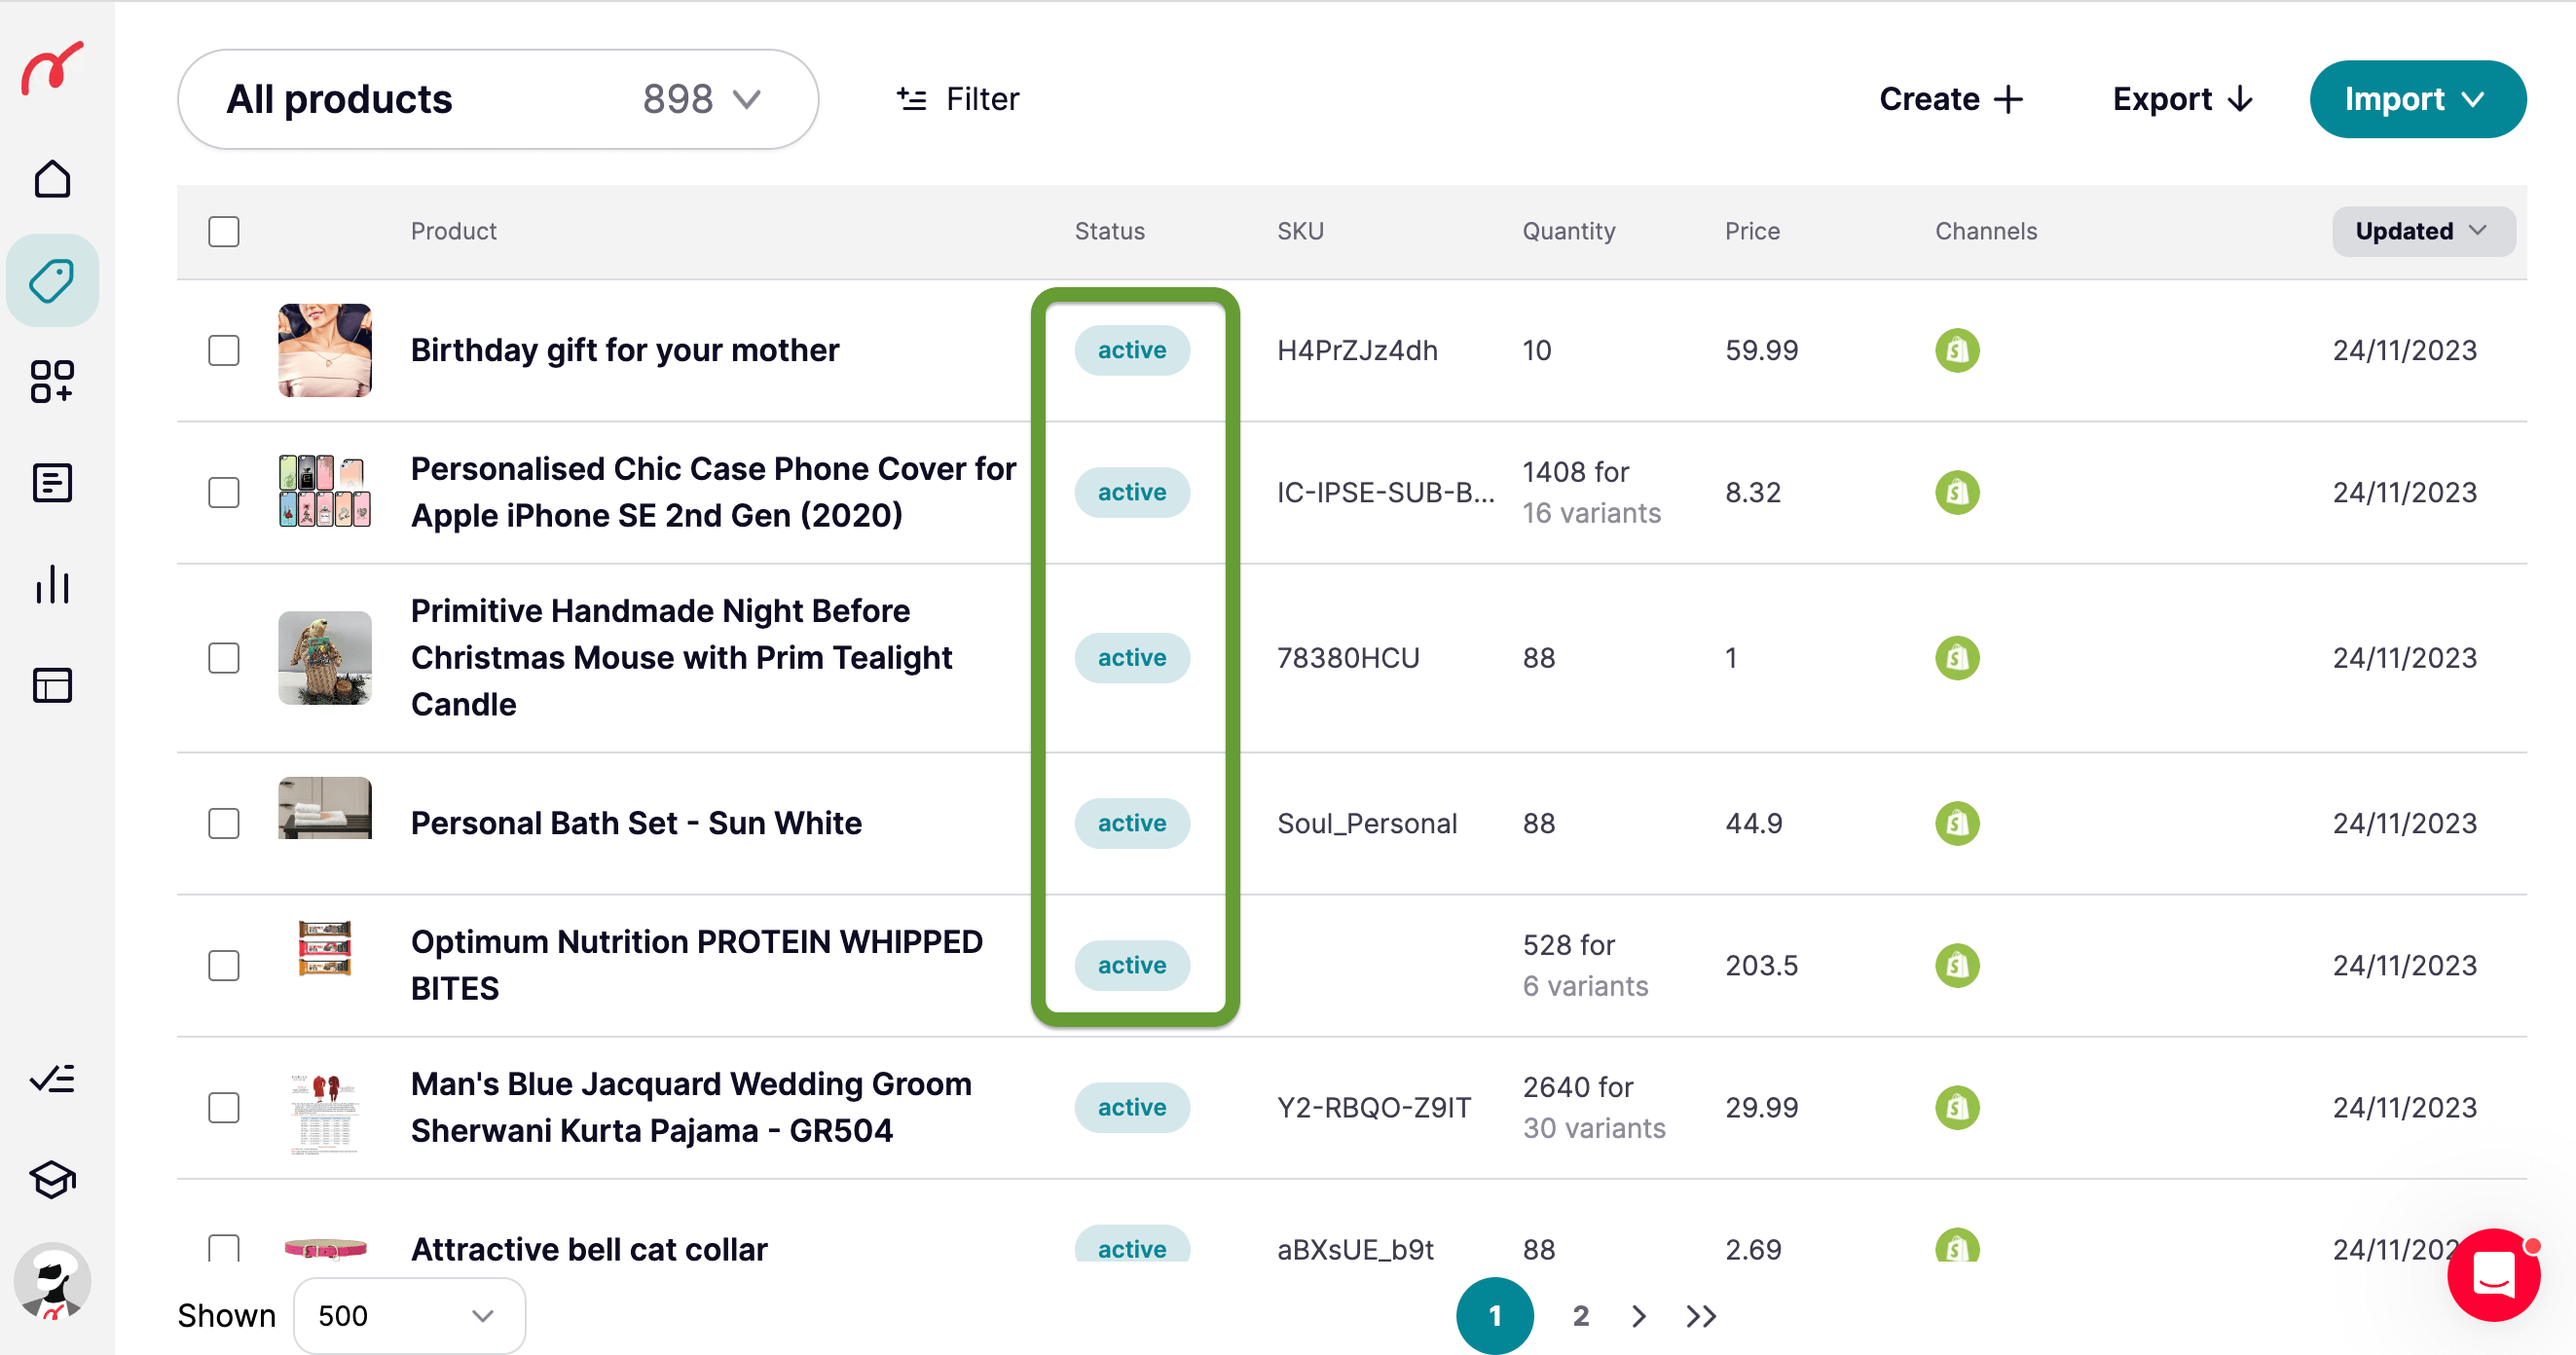

Please note: imported products have the “active” status.
Once your listings are in Nembol, you are advised to click on one of them to look into it and see if the information imported from the source channel is up to your needs. You can edit it if you like, then you select it and click Publish.
Note that the product edits you complete inside Nembol will NOT sync back to the source channel, unless you set Nembol to do so in each channel’s settings.
How to list imported products on additional channels
Once your products are inside Nembol as shown above, and once you double-checked you like the content, you are advised to select 3 or 4 of them and test-list them (yes: you’ll bulk list 50, 200, or 500 only later once you are a pro-Nembol user).
To do this, toggle a few of them, pick “Publish” from the Actions menu. You will be able to select channels later.
See screenshot below.
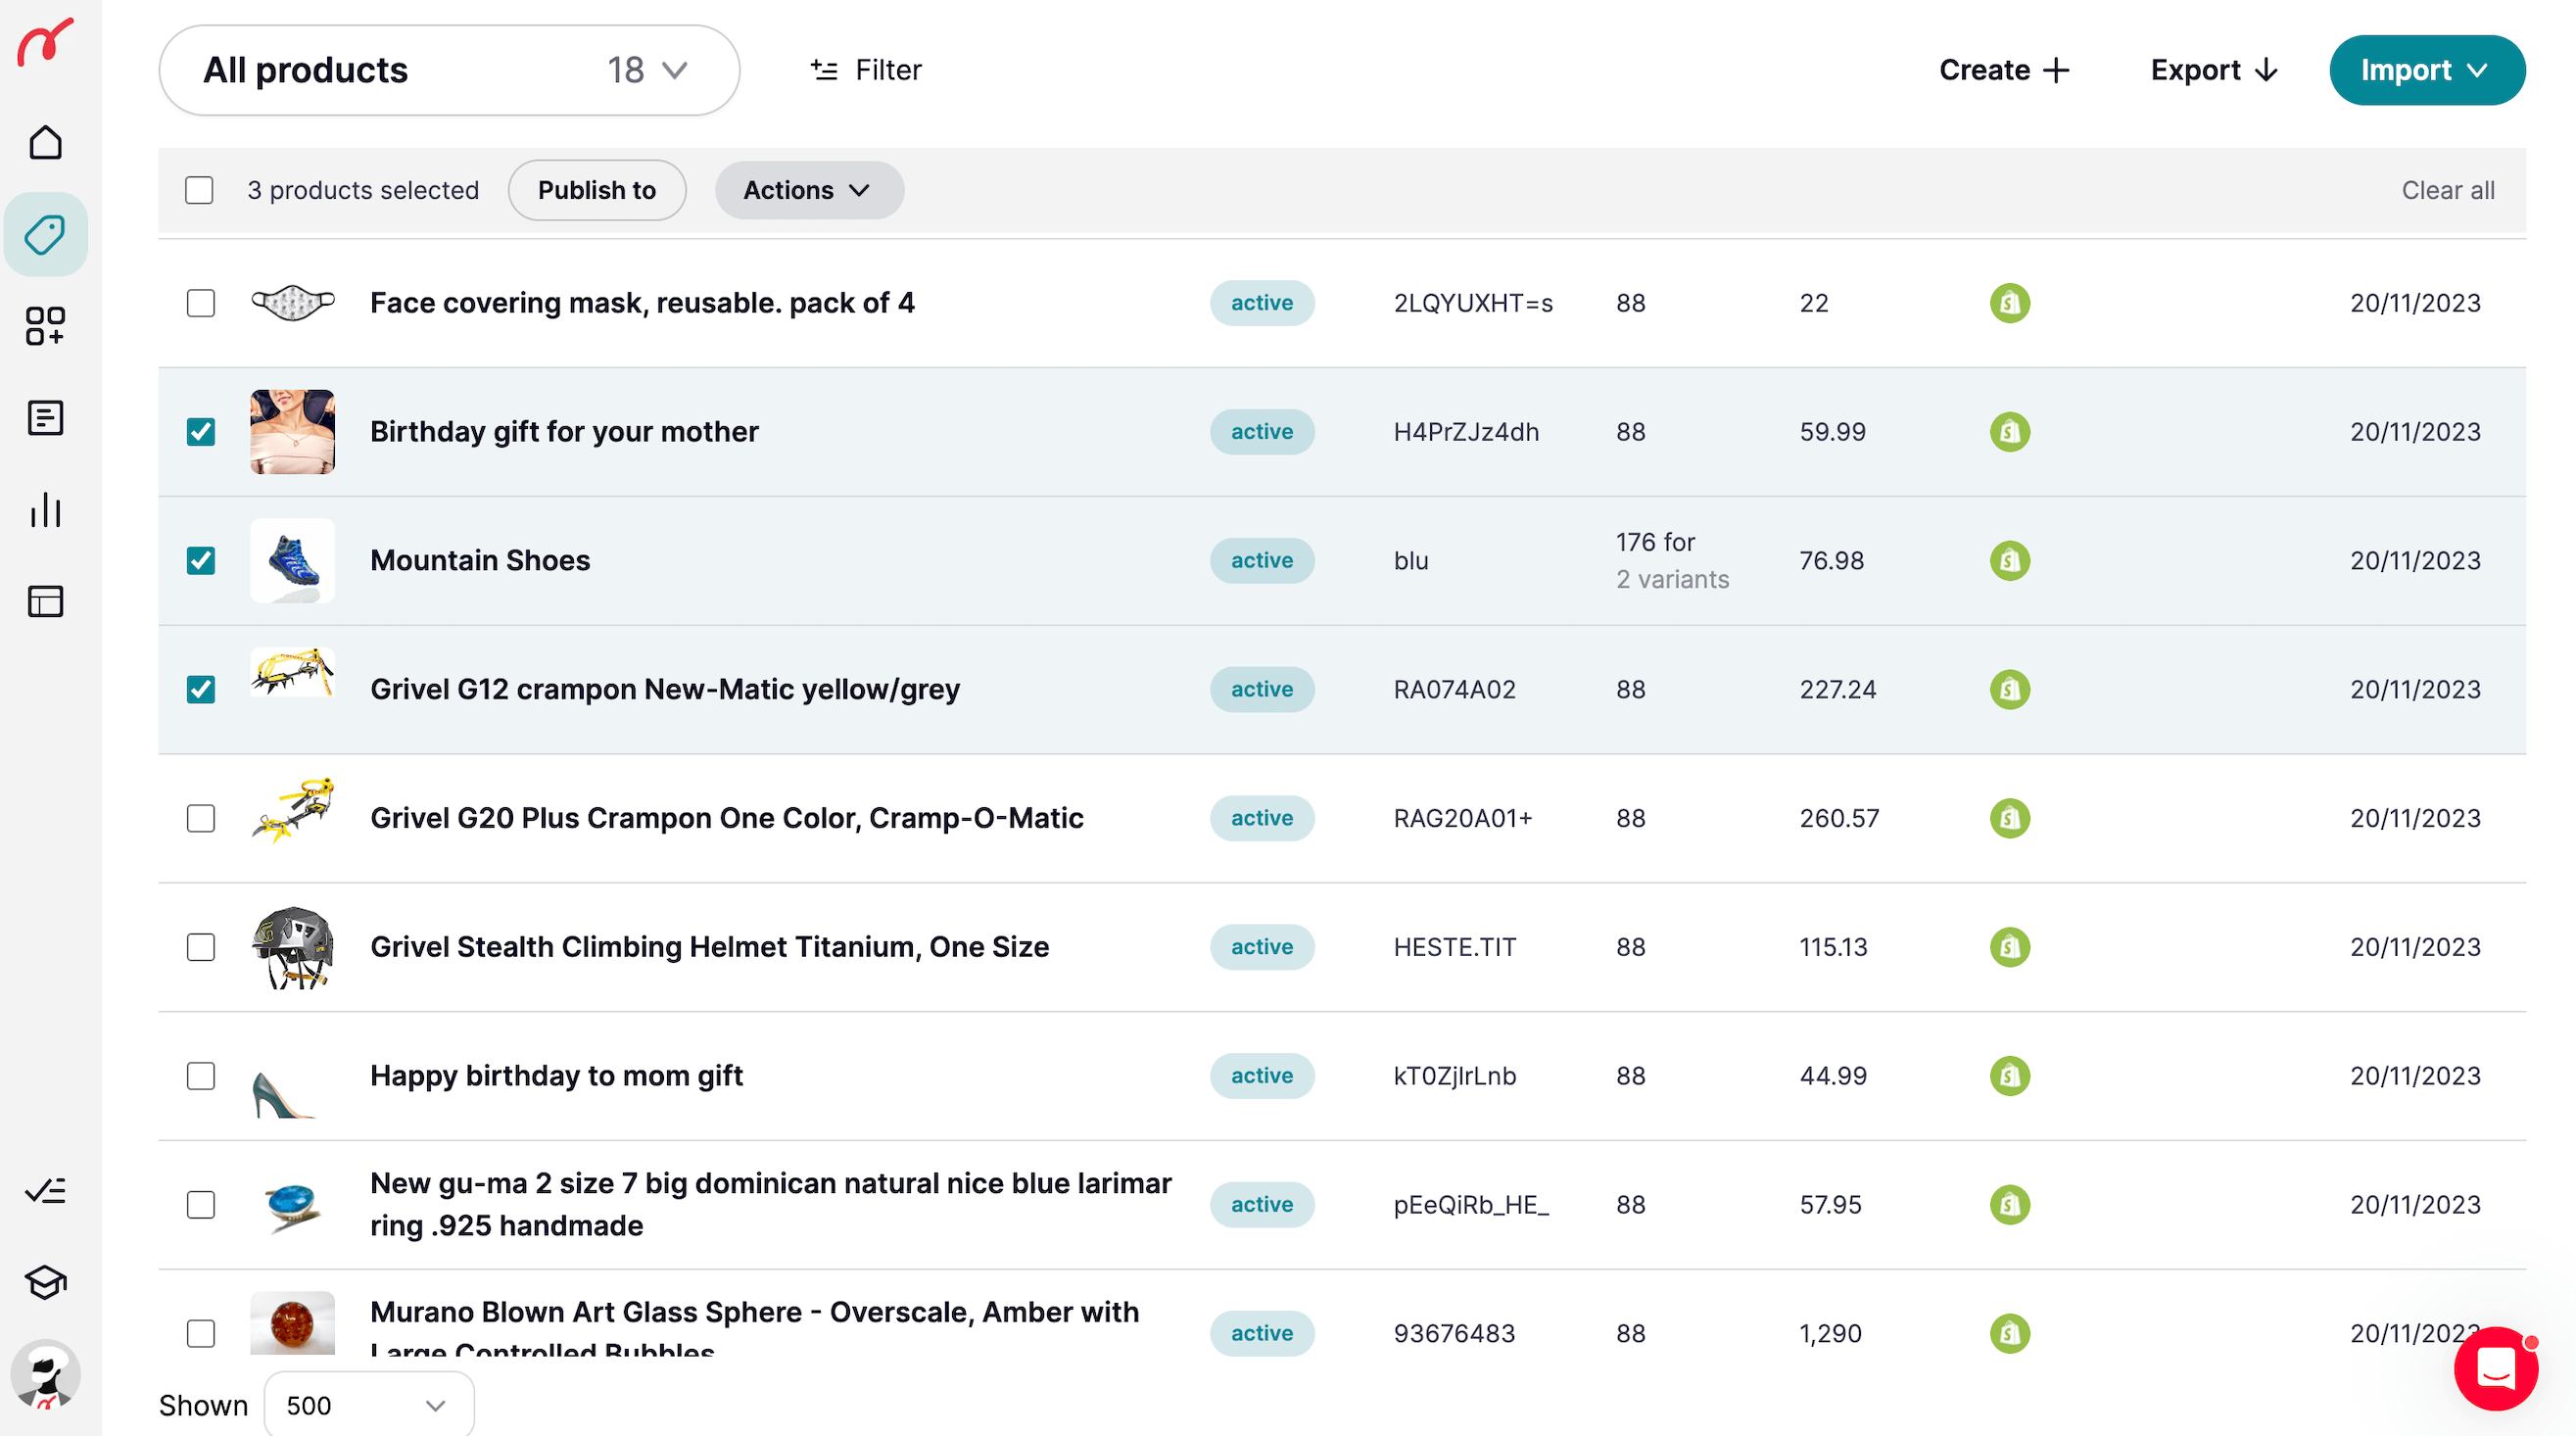

As a next step, Nembol will allow you to select on which channels you wish these products listed.
As you can see in the screenshot below, before publishing the products on the channels you have a review of your channel settings. If you want to change something, scroll down and click on the “Settings” button. You will be redirected to the Channel settings (in this example in the Etsy channel). Once you have made changes, these will be saved automatically and you can proceed with the publication of your products.
When you start, you are advised to test a few channels at a time, solve any issues that may arise, double-check you like all, and only later bulk list hundreds of products on tens of channels.
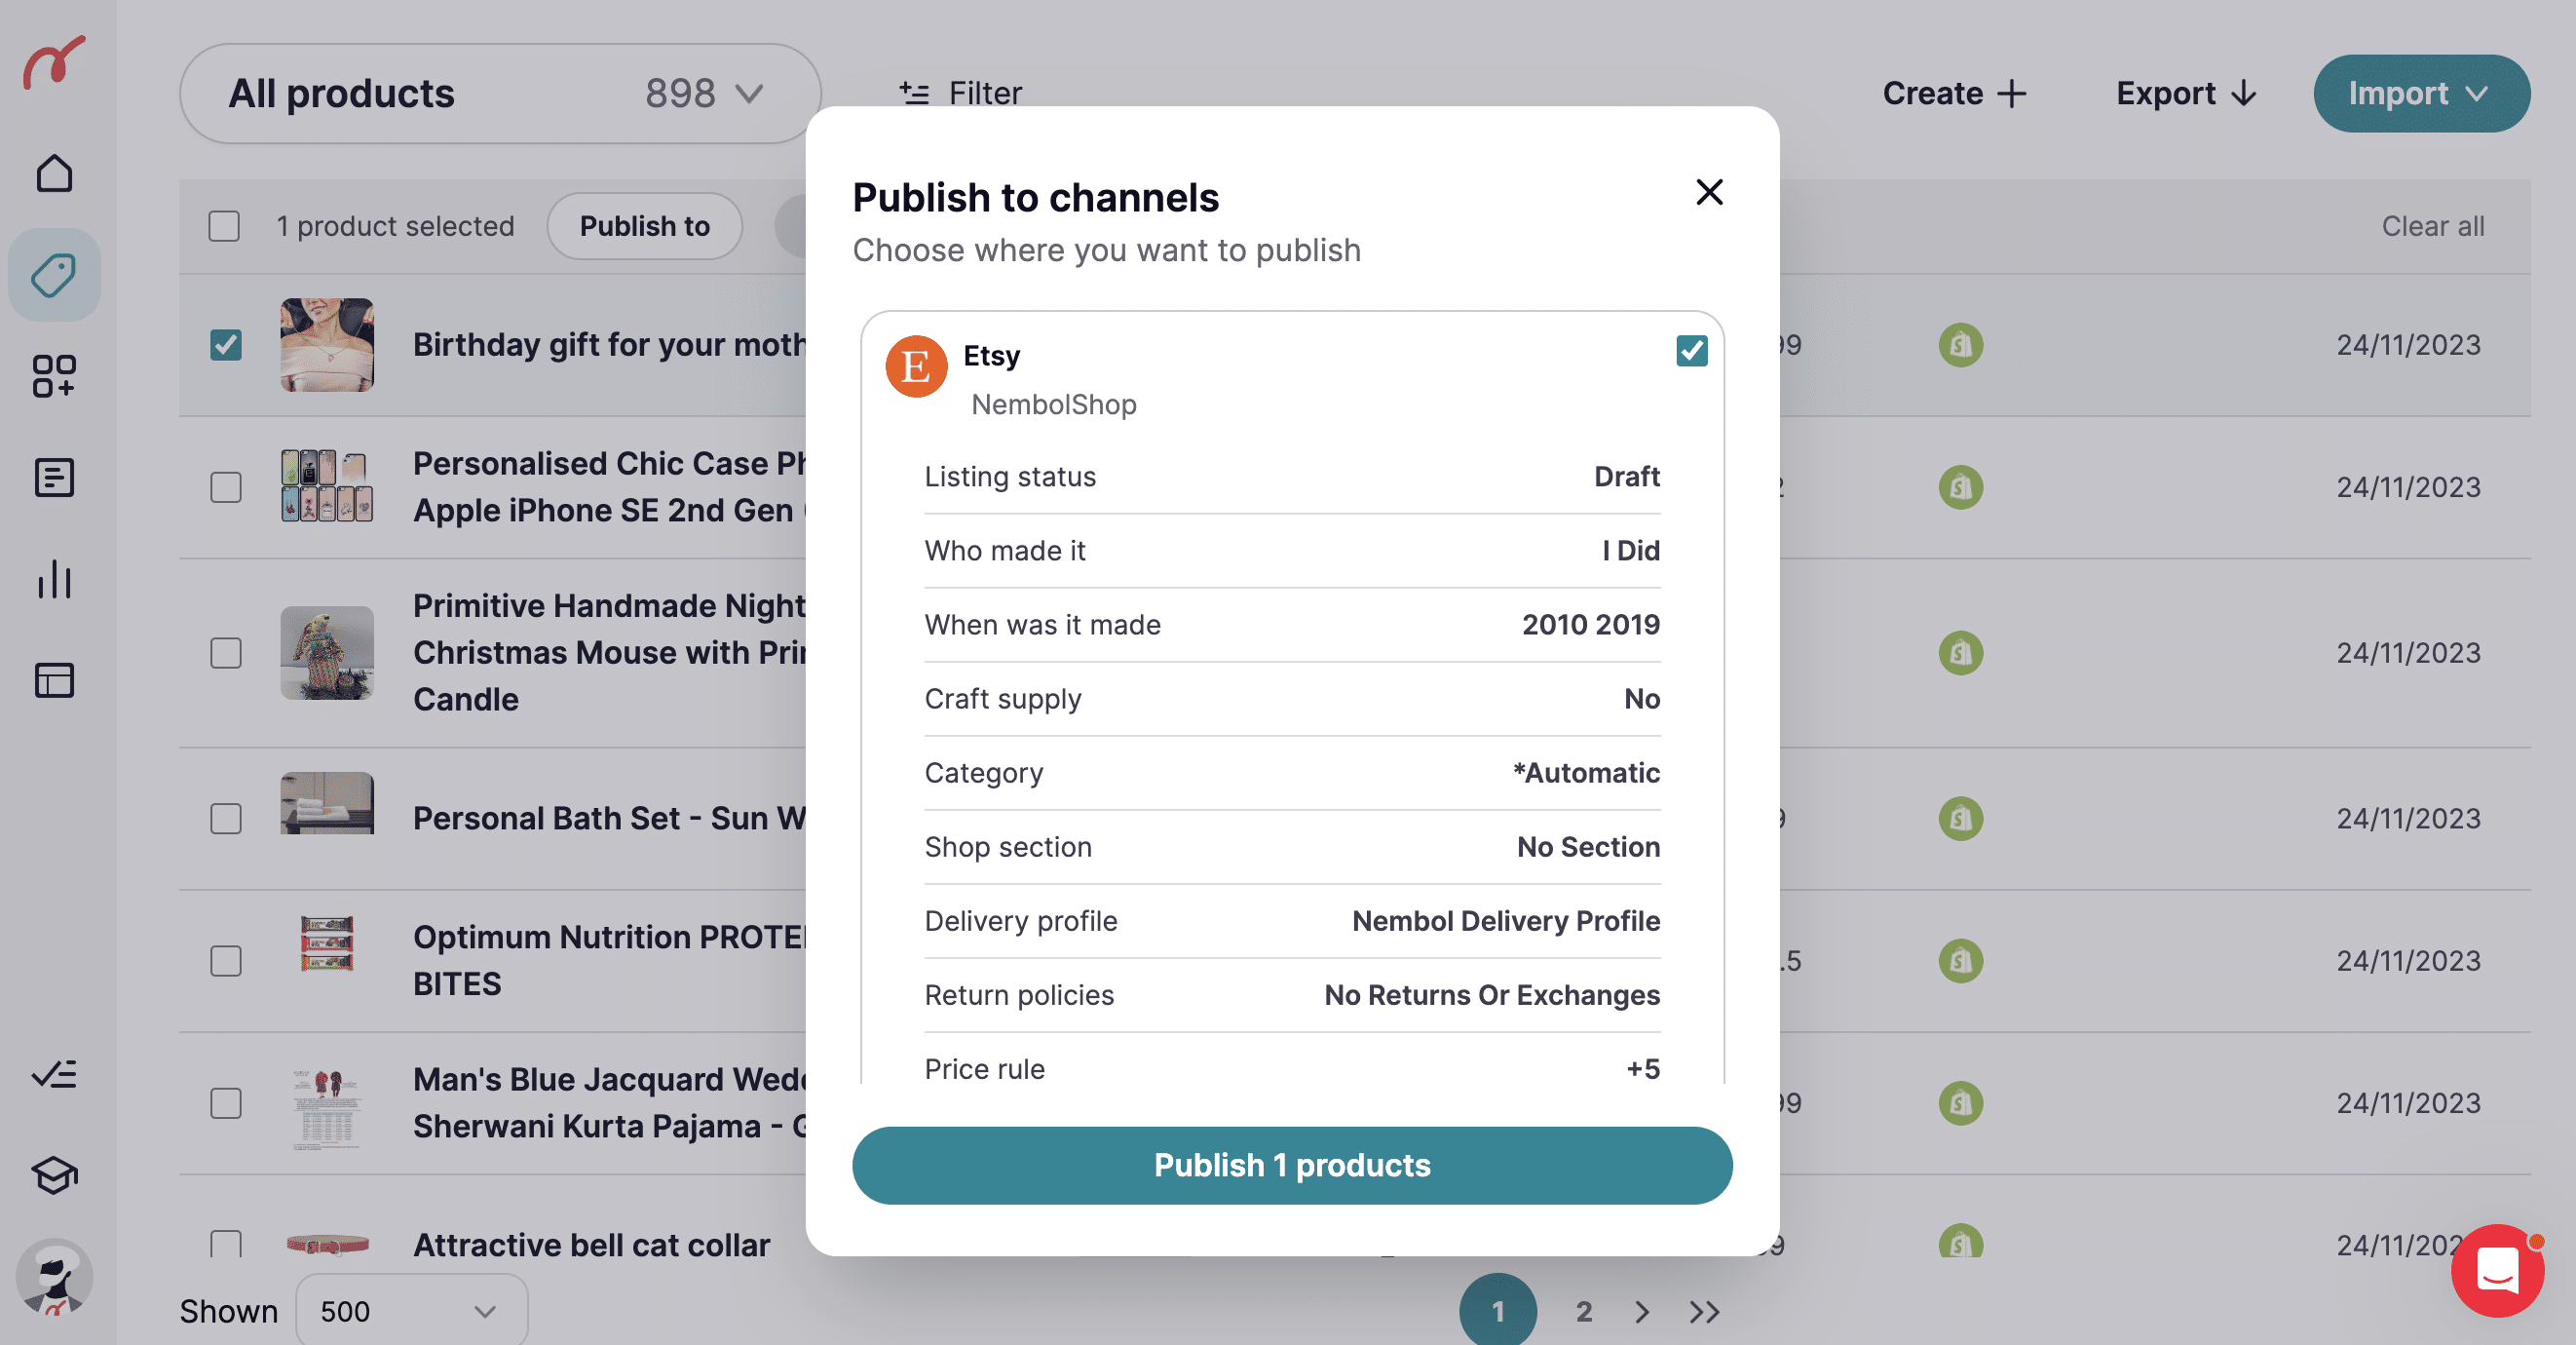

You will see “Bulk publish started” and within seconds or minutes, products will be listed on the chosen channels.
On the product in Nembol, you will see the icons of the channels on which it is listed. By clicking on the product you can see which channel it was imported from and on which it was listed (screenshot below).
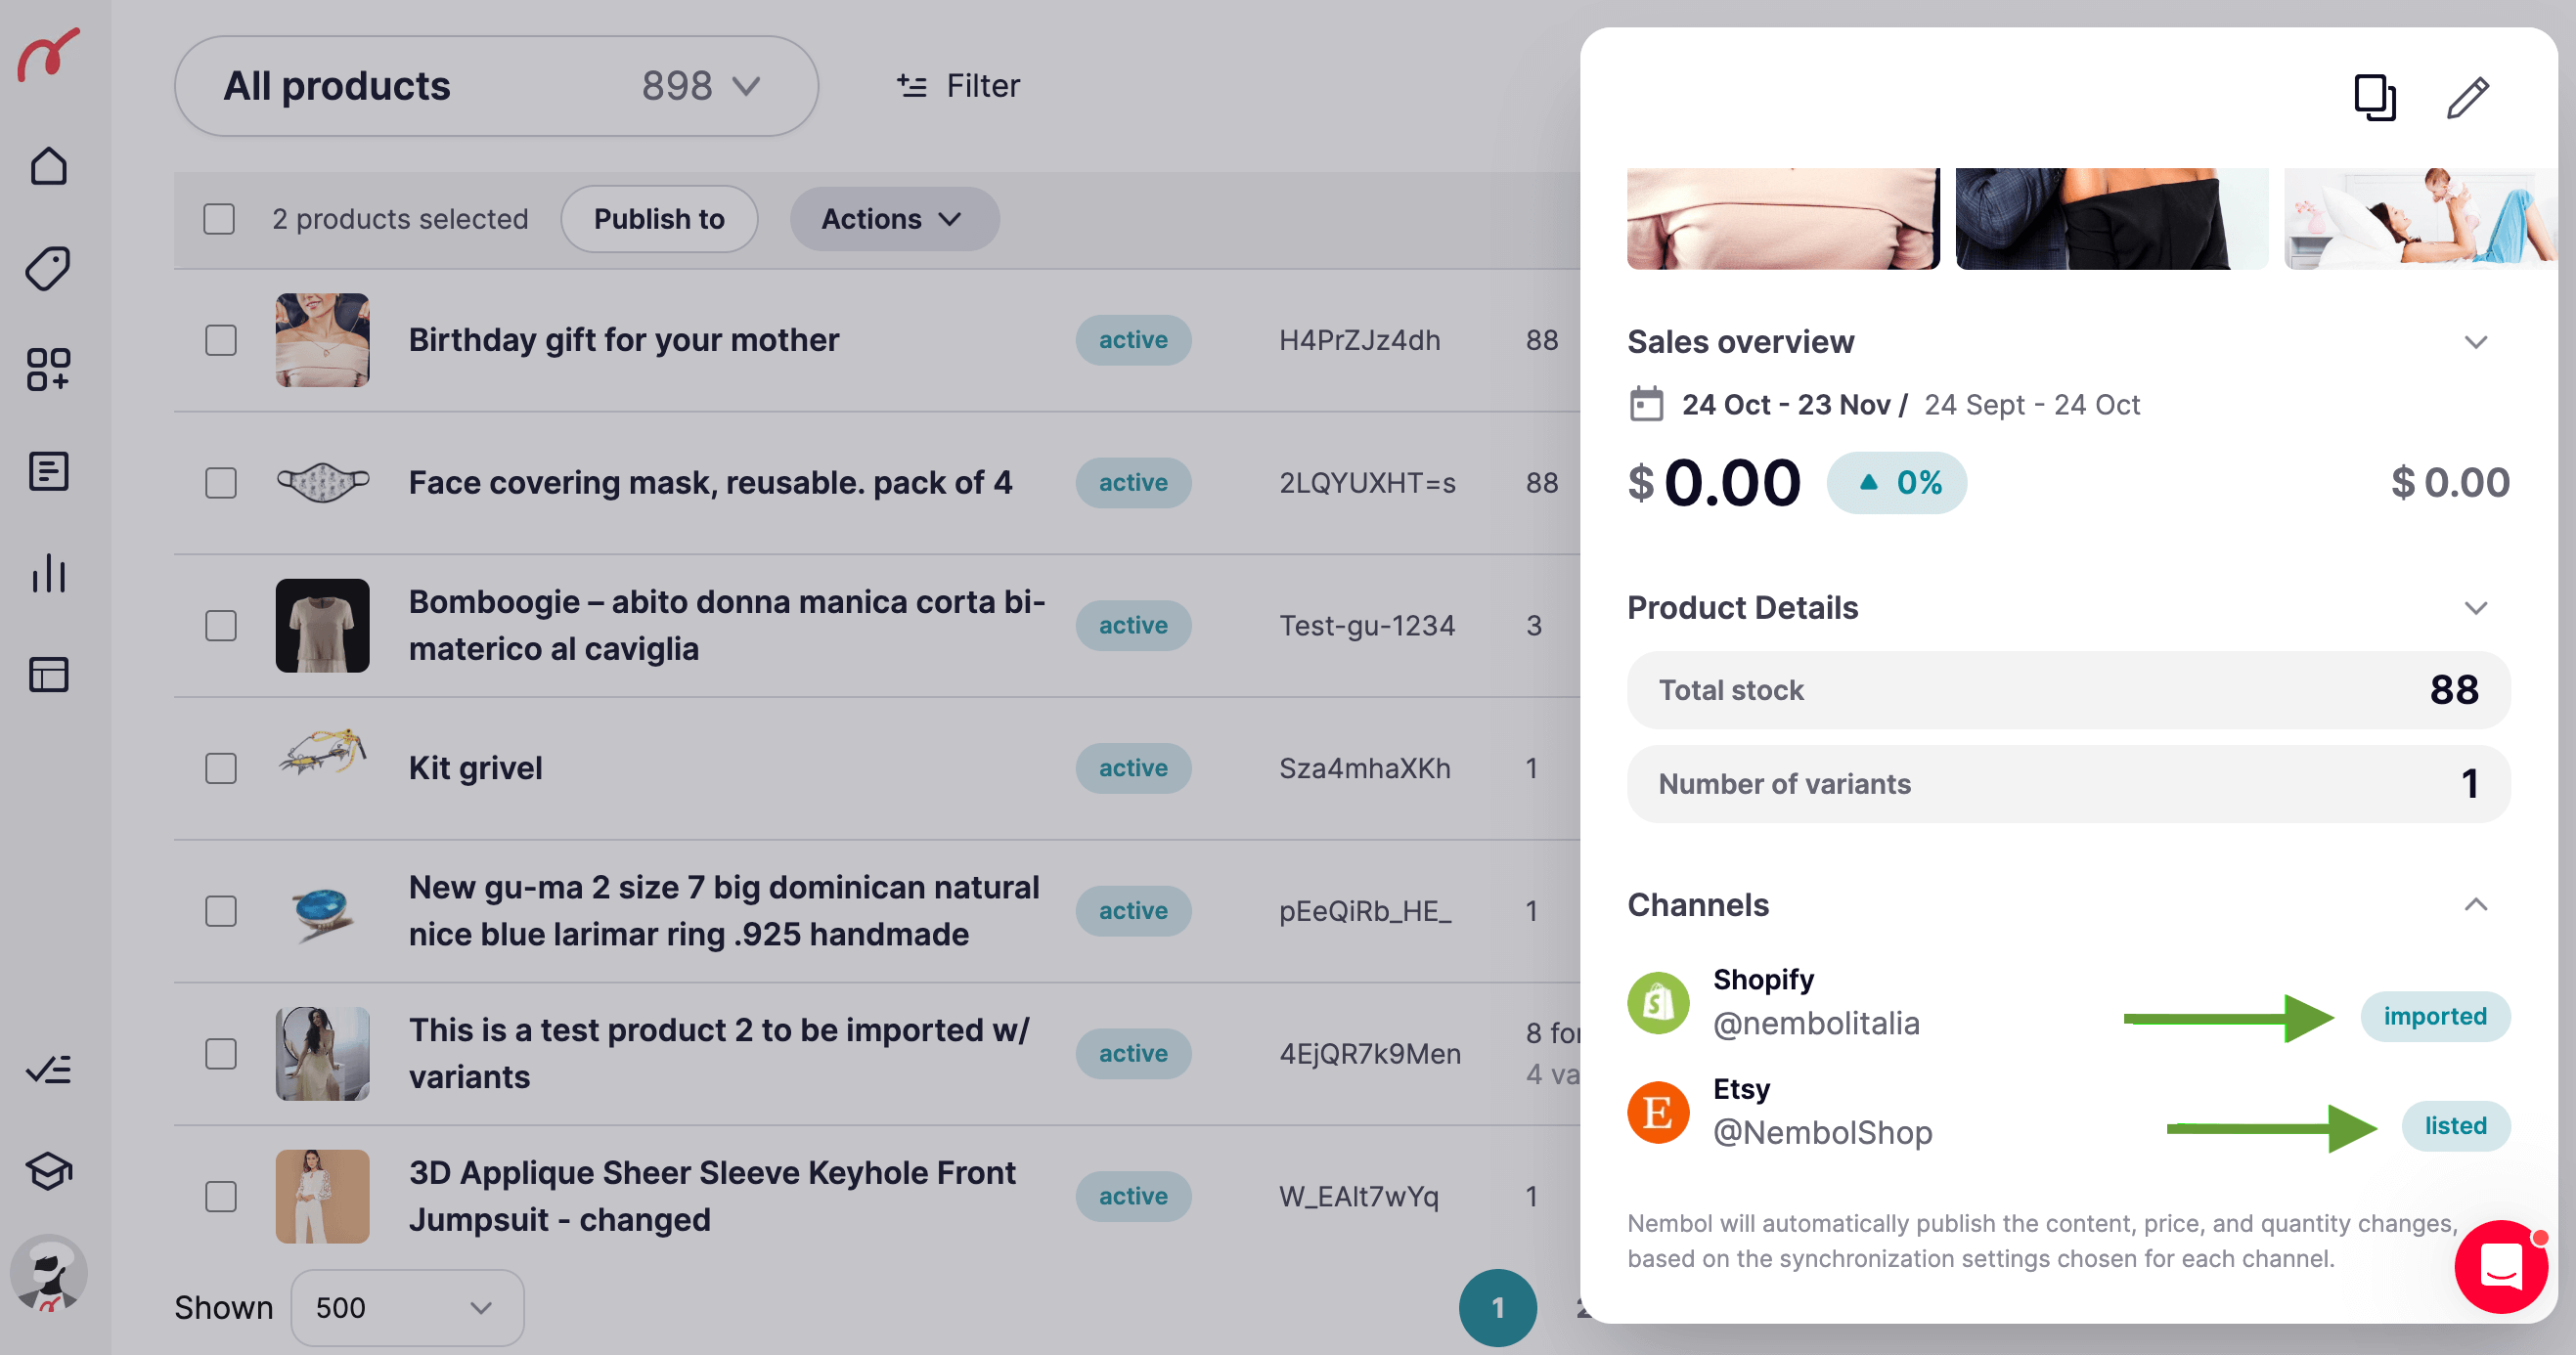

Nembol comfortably links you to all listings on all channels, so that you can check the results right away. Just click on the eye-icon after having clicked on a listed product in Nembol.
Now your listings are on the new channel, or channels, you chose. Starting from either a manual listing done in Nembol, or a set of listings automatically imported in Nembol from a connected channel. We call the latter the “source channel” or “import-from channel”, and the former the “destination channel” or “list-to channel”.
Errors returned by channels
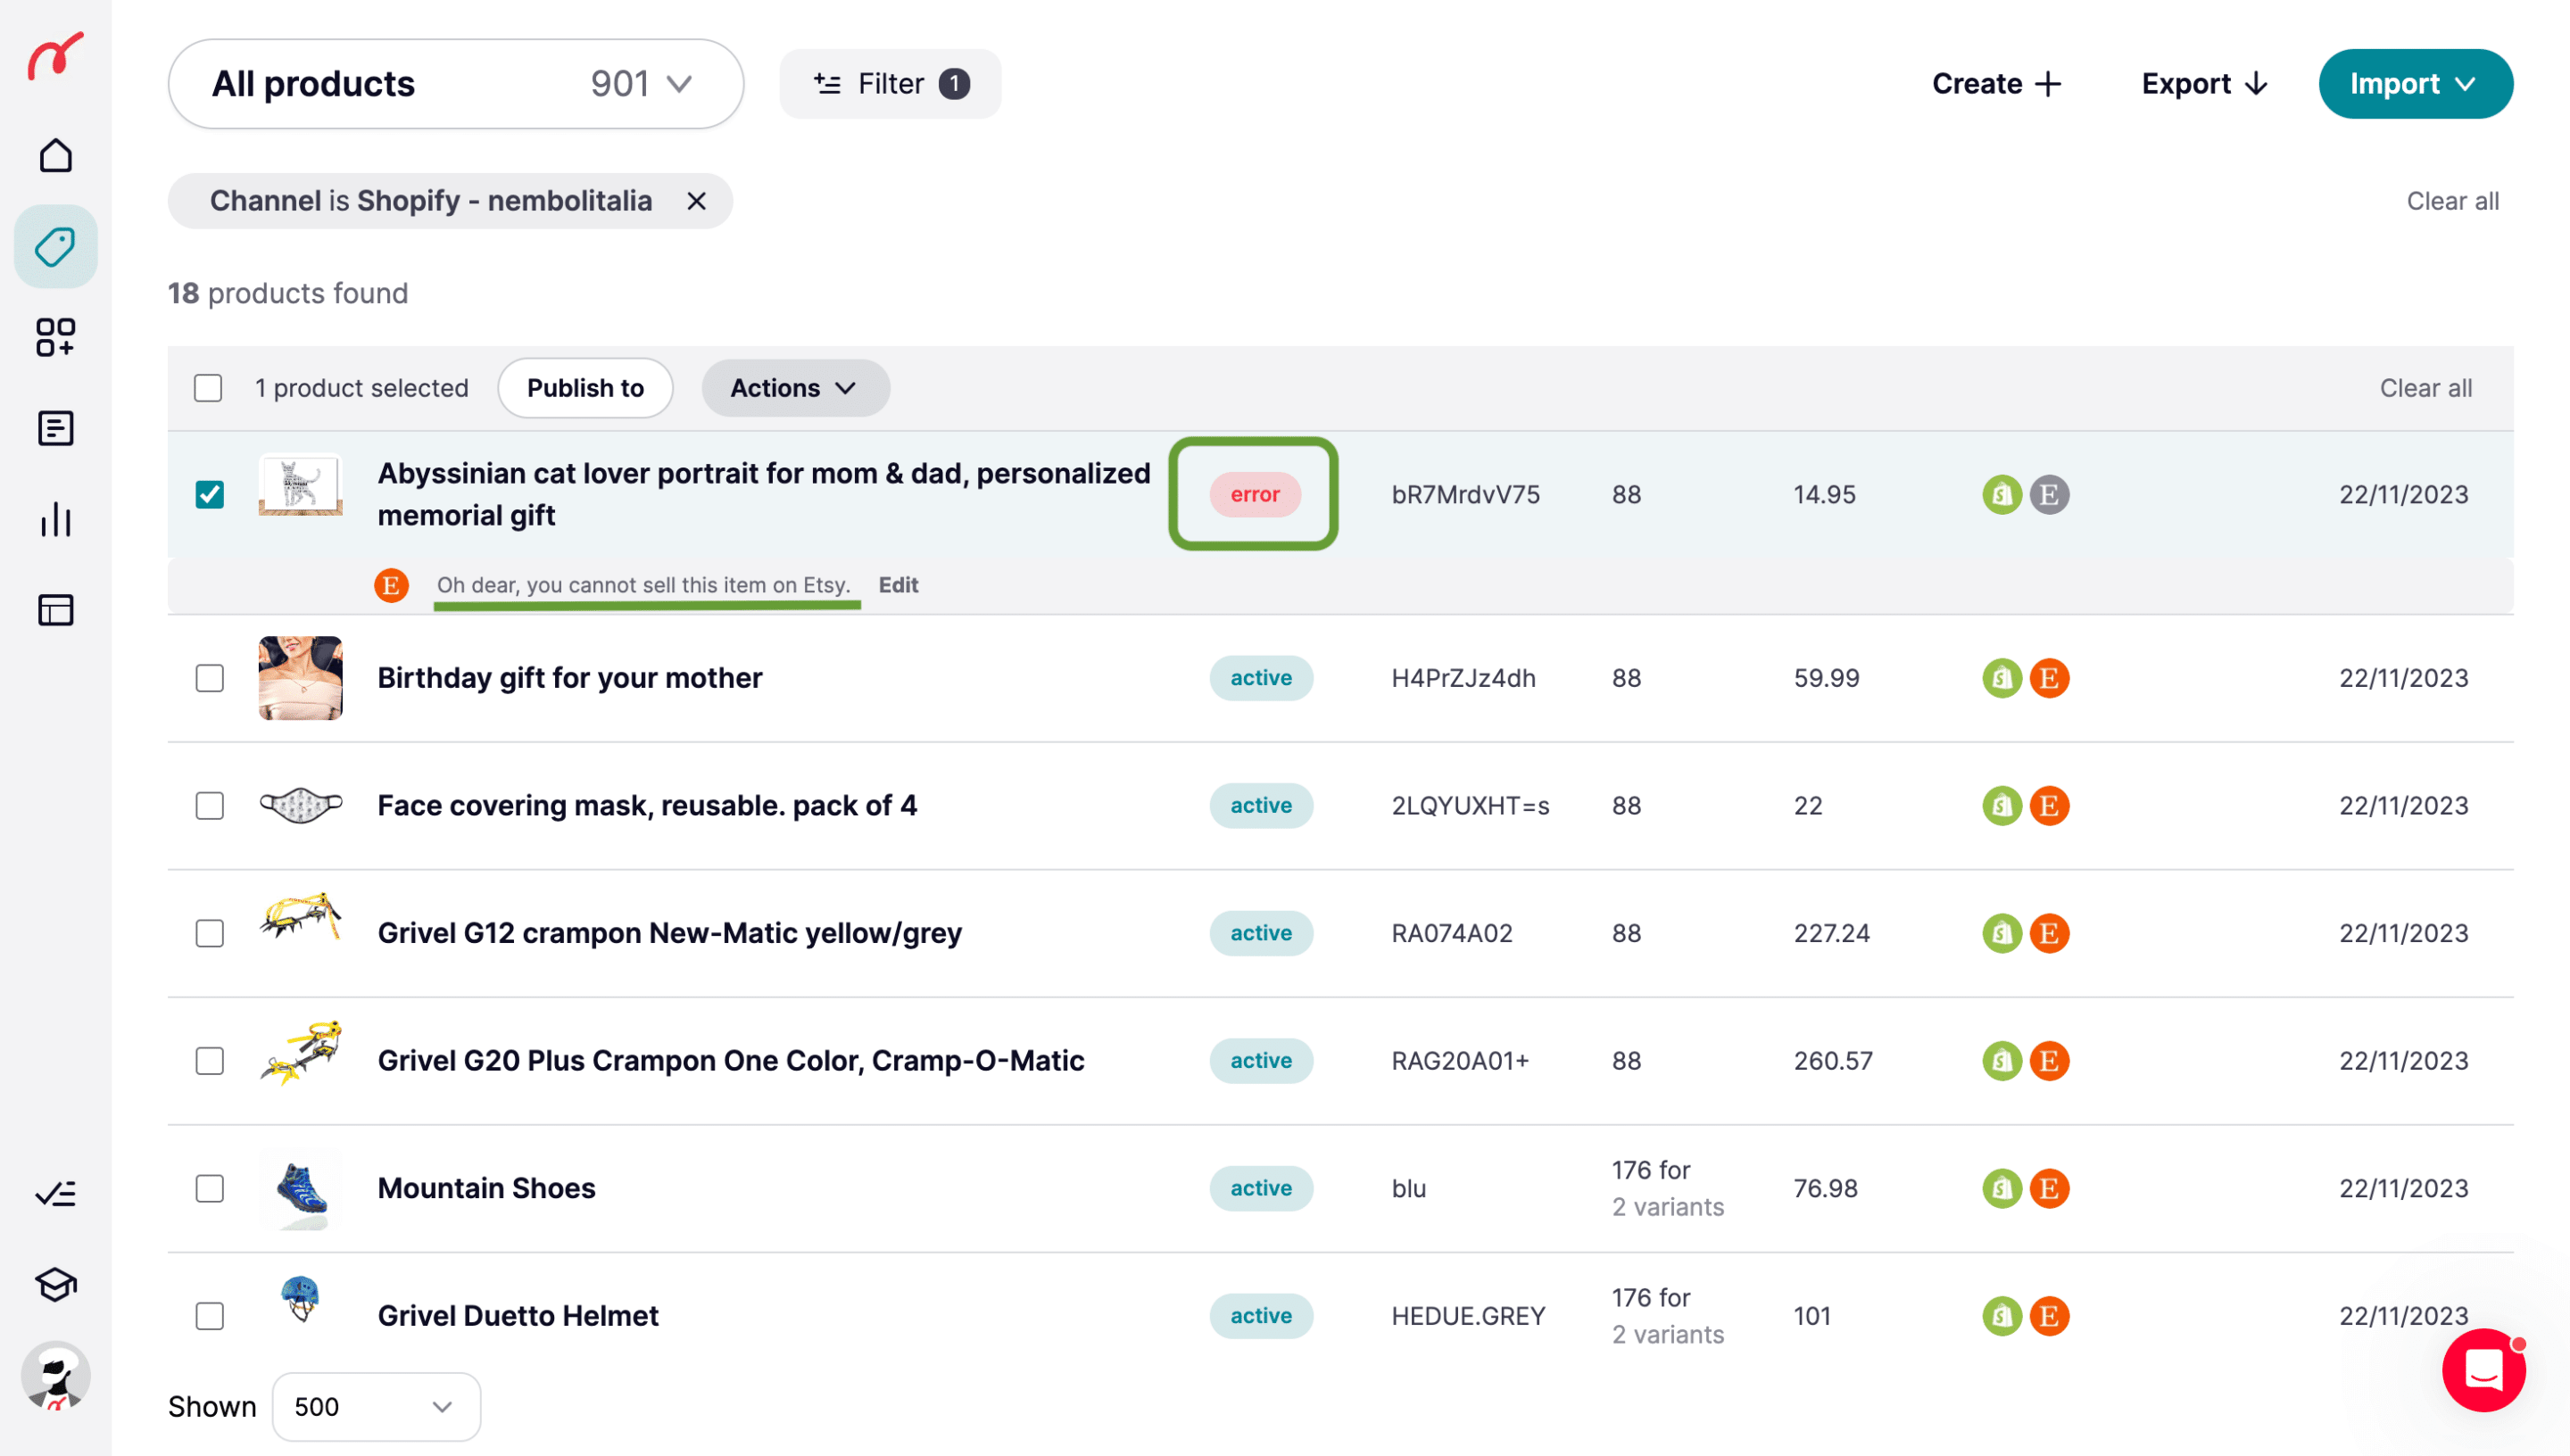
If one product is in error, you will see the “error” badge near the name of the product. The errors are returned by each channel according to their listing rules.
Nembol can help you solve them but will not be able to avoid them all at the onset of your multi-channel activity. Errors are normally easy to understand and solve, as in the example in the screenshot below. You’ll need a little bit of time and experience to become a proficient multi-channel lister.

How to connect the listings you already have on multiple channels, without re-listing them
Some sellers have years of activity in their background and are already selling on multiple channels, maybe three or four of them. If you are one of these folks, and have a few hundred or a few thousand listings outstanding, you probably would like to do one of the following things:
- Connect your listings on two or more channels to keep their inventory in sync.
- Sync listings without needing to re-list any of them, because channels either charge a listing fee, or attribute importance to the age of a listing.
- Edit all listings in the same place.
Linking existing listings is thoroughly described in this article in our blog. In short: Nembol will connect your listings across channels, based on their SKU code, without needing to duplicate them in Nembol, or re-list them on any channel. As long as listings share exactly the same SKU codes.
It works this way:
- You choose what is your “Lead” channel. The one channel you wish to import listings from. Maybe it is where you have more of them, or where the quality or completeness of your listings is the best, or where the prices are more correct.
- You make sure each SKU listed on that channel has its own unique SKU code, and you import from that channel into Nembol.
- Then you connect your second channel, verify you have the same SKU codes for the shared listings on this second channel too, and you click “Import” in Nembol from this second channel. Nembol will NOT import duplicated listings, but just link them.
- I.e. your listings have not been listed via Nembol, but they are nevertheless connected: the inventory is now linked (with the quantity of the “lead” channel leading the others), as product descriptions are.
- You may repeat the same for multiple other channels.
Now your listings are connected, or “linked”, and you can pilot their stock count centrally as their prices and content.
Summing up: how to list products on multiple online channels.
We’ve seen in this article that you should list your products on multiple online channels, and that you can:
- List on multiple channels starting from product content in and Excel file or Management Software
- List online if you have no product content at all: you can create it and keep it backed up in Nembol.
- List on additional channels if you already have your listings on one online venue, being your e-commerce store or a marketplace
- Connect, or link, your listings already existing on multiple marketplaces or e-commerce stores, with not need to recreate them.
This article will pave your way into being seen by thousands of additional potential buyers.
Do not hesitate to contact us in case you had any e-commerce related questions. Or also if it is a nice spring day at your place, with blossoming flowers and you just want to share it.
Enjoy!

